Practical part of the lesson, drawing
Before starting the lesson, the teacher needs to decide on the drawing technique and materials. There are several types that young children can quickly master:
- Drawing with pencils: using thick and thin lines, mixing colors, shading.
- Watercolor: painting in one or more layers, mixing colors, using brushes of different thicknesses, adjusting the transparency of layers.
- Gouache: Layering different colors on top of each other.
Note! When using gouache, you can paint without brushes. To do this, you can ask the children to cover their hand with paint and apply it to a blank sheet, and then give free rein to their imagination. Such a drawing is not only faster, but also more interesting, because children will have to improvise and figure out how to make a bird out of their hand. For example, the bent thumb can be the head of a bird, and the other four can be wings or a tail.
Drawing with a handprint"
Musical accompaniment
To prevent children from getting bored, you can play music in the background. Since the topic of the lesson is “beautiful bird drawing in the middle group,” then choose the singing of birds. In this case, you can put different votes, asking you to guess who it belongs to.
Didactic games for older children
Step by step drawing process
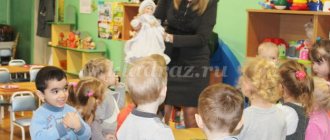
Before you begin the creative process, you need to show the children a sample of the drawing that they have to complete. It is better if the teacher makes it with his own hands, so that the children can see the finished drawing and what it should look like.
The bright bullfinch is familiar to every child."
A short summary of drawing with children:
- Schematically depict simple shapes that will be the head and body of the bird. These will be a circle and an oval, respectively.
- Connect the head and body using curved lines representing the neck. Draw legs and wings to the body.
- Go to the head: draw the beak, eyes, crest (optional). Children should be given freedom at this stage, let them choose for themselves what type of bird their bird will look like, be it a penguin or even a rooster.
- Trace the contours with the necessary materials, and then untwist everything else.
- Draw plumage and other decorations on the bird.
Important! You can offer to draw clothes or other elements typical of people on the bird. This will not only complement the drawing, but will also help the child develop thinking, because he does not just give the animal human traits, he wants to highlight something in its character, i.e. thinking about creating a complete image. For example, if a child draws luxurious decorations for a bird, then he wants to emphasize that this bird is beautiful, and if he gives it a book in its paws, then this means that it has remarkable intelligence.
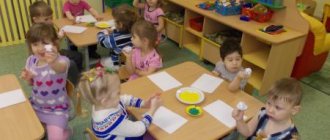
Materials and equipment needed for the lesson
Before starting the lesson, you need to prepare all the materials that will be needed during the lesson. They can be divided into 2 categories:
- Demonstration. Illustrate what children need to do. Since the goal of the lesson in the middle group is to draw a beautiful bird, it is necessary to show this animal. This can be done using a computer and a projector connected to it or illustrations from books.
Note! Children should see not only the familiar birds that live in Russia (sparrow, waxwing, woodpecker, owl), but also exotic ones (kiwi, peacock, flamingo). This will help the children realize how diverse the world around them is.
You can give children coloring books as practice."
- Handouts. Necessary for drawing. These include A4 drawing paper, pencils or paints, brushes and sharpeners, and water in special glasses. If desired, you can distribute templates, but it is better for children to learn to draw on their own.
Important! Give each child a cloth with which they can dry their brush. The fabric will also come in handy if someone gets dirty with paint, which often happens even among adult artists. If the purpose of the lesson is to draw with pencils, then you need to distribute an additional piece of paper that can be used to shade hard lines. Paper is also needed to prevent the material from imprinting on their hands, which children can place directly on the drawing.
Step-by-step drawing of a person for children in preschool educational institutions
Specific options within the theme “Birds”
According to T. Komarova’s fine arts program, in the preparatory group two lessons are devoted to drawing birds: this is drawing an illustration for the work of Mamin-Sibiryak “The Gray Neck” and “The Magic Bird”. However, the topic of birds is so interesting and multifaceted that the teacher clearly should not limit himself to only this. So, options for the feathered theme could be as follows:
- Owl-owl (a very bright image that can be depicted in different techniques).
- A flock of migratory birds (theme is proposed in autumn or spring).
- Cockerel is a golden comb (can be associated with some fairy tale, for example, “The Cockerel and the Bean Seed” or “The Tale of the Golden Cockerel” by A. S. Pushkin).
- Titmouse (you can draw on November 12 or not far from this date, when people celebrate Titmouse Day).
- Bullfinches on a branch (of course, this theme is offered in winter).
- Swallow (it’s good to connect the image with the fairy tale “Thumbelina”).
- Poultry (poultry yard as an option). A child can simultaneously portray a chicken, a rooster, a duck, a goose, a turkey, or one or the other.
- White-sided magpie.
- Swan on the lake (as a variant of the swan princess of A.S. Pushkin before her transformation into a girl or an illustration for Andersen’s fairy tale “Wild Swans”).
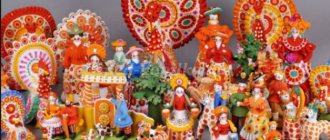
- Kargopol birds (drawing based on folk toys).
- Fairytale bird (Firebird).
Older preschoolers always find collective compositions interesting. The “Magic Bird” work is popular, when each child paints a feather to his own taste, and then a gorgeous tail is assembled from them (the teacher prepares the base in advance - the body of the bird).
Each child paints the feather according to their wishes, and together they make up the original tail of a fairy-tale bird.
Here again, you can take an individual approach and invite some children to color two feathers.
Another option for joint creativity is “Birds at the feeder.” The teacher draws a tree with branches and a feeder, and preschoolers complete the composition with birds.
The theme “Birds” encourages the creation of collective compositions