Representatives of the bird world are found in nature in an amazing variety, they symbolize the sky, freedom, life and abundance. Sketches of birds often appear in children's albums.
Drawing birds is not only exciting, but also educational, because children get acquainted with forest, domestic and exotic species.
Parents should tell their child about their value to the natural environment, their anatomical structure and differences, sometimes even watching the winged singers from the window and feeding them in the winter.
Bird body structure
Beginning artists will understand how easy it is to draw a bird if they better learn the techniques and basic rules.
- — All birds have a streamlined shape. This shape is necessary for flight.
- — The skeletal structure of birds is the same. Only the length and size of the individual parts change.
- “The feathers overlap each other like tiles on a roof.” The overlap begins along the front of the crown, then goes down the back to the tail.
- — The structure of the wing corresponds to the structure of the human upper limb, i.e. shoulder, forearm and wrist. The “brush” is the place where the first flight feathers begin to grow.
- — Birds’ knees are almost invisible. It is often covered with feathers.
- — Bird paws are arranged as follows: three fingers point forward and one back.
Digestive system
The high metabolism of birds is supported by a digestive system of a specific structure. Food captured by the beak travels through the esophagus into the crop, where it swells and begins to be digested.
The anterior section of the stomach is glandular, where the chemical breakdown of nutrients takes place; in the second section, the muscular section, mechanical grinding of food masses takes place. Afterwards come the duodenum and small and large intestine, which opens into the cloaca, along with the ducts of the excretory and reproductive systems.
Digestive enzymes are synthesized by the pancreas and liver.
Sketching
Sketches are essential for beginning artists. Just a few strokes allow you to determine the movement and outline of the bird. There is no need to be afraid of imperfect sketches, because their purpose is to prepare the ground for further detailed elaboration.
Each person who undertakes to draw birds must use different possibilities. The first step is to study the drawn pictures of birds. They help to understand the structure of the feather, to anticipate how light and shadow are distributed.
Circulatory system
In representatives of the class of birds, a separation of arterial and venous circulations appears for the first time.
The heart has four chambers, so venous and arterial blood pass through it without mixing. The consequence of separation is intense gas exchange and constant body temperature, that is, warm-bloodedness.
The most peaceful bird. Drawing of a dove with a simple pencil
Using the example of a dove, you can consider how to draw a bird with a pencil.
This bird was not chosen by chance. The dove is depicted in school wall newspapers dedicated to Victory Day and May 1st. He is a symbol of peace and happiness. Newlyweds use this bird as decoration.
- The drawing begins by creating a basic outline that includes the wings, head, and torso. The head is outlined. An inclined line is drawn from it - the body (if the pigeon is flying, its tail is lowered down). The wings are indicated by a “tick”.
- The outline of the tail and the outline of the entire body are drawn. The paws will be in the form of short lines.
- The visible eye and beak of the bird are drawn.
- The contours of the plumage are outlined - on the wings and tail.
- The legs are drawn.
- The wings are divided into segments - this makes it easier to draw feathers.
Flamingo from bottles
To make this product you need large plastic bottles (5 and 10 liters), a polymer pipe about two meters long, a corrugated pipe about sixty centimeters long, acrylic, wire, foam.
The base body is made from the largest bottle. In its bottom you need to cut 2 holes according to the diameter of the polymer tubes (future legs). Feathers are cut from smaller five-liter bottles and attached to slits in the body.
A neck is made from a corrugated pipe, which is inserted into the neck of a ten-liter bottle. The head is cut out of foam plastic. Eyes are drawn with a felt-tip pen and a black plastic beak is attached. It is better to start attaching the feathers from the very bottom to the mesh.
Rainbow bird. Drawing of a parrot with felt-tip pens
Step-by-step instructions for beginning artists will help you, step by step, to depict a bird that has absorbed the entire palette of colors.
- Two ovals are drawn with a simple pencil. The smaller upper oval is the head. The bottom one will be larger - this is the torso.
- Four stripes are drawn down from the large oval. This is the future tail.
- Wings are added. One is depicted on top of the oval (body) in the form of a large drop. The second, partially visible wing is drawn in the form of half a drop.
- The beak is drawn. It looks like a triangle with a curved top.
- The general image of the parrot is clarified. Auxiliary lines can be erased at this stage.
- You should “plant” the parrot on a branch. The branch is depicted as a wavy line. Paws in the form of small ovals on top of the branch. In this position they look like a human fist. The claws are being drawn in.
- The eye is drawn. A parrot's eye looks like several circles nested inside each other.
- The tail is detailed - the lines turn into pointed ovals.
- Now you can color the bird.
The Macaw parrot is most often red. The beak is yellow. You can add orange to the wings. And put rainbow colors on your tail! The last circle of the eye is painted over with black and a spot is left for highlight (the remaining circles are not painted).
Birdhouses made from milk bottles
Don’t rush to throw away milk bottles and Kinder surprise containers, because you can make an attractive craft out of them. Round holes are cut in milk bottles, clothespins are glued to the bottom of the bottles, and the birds themselves are on them in the form of kinder boxes. Just decorate the birds' bodies with down or feathers, colored paper, and also draw eyes on them with a felt-tip pen, then the craft will be completely ready.
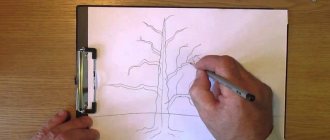
Summer bird. Drawing of a swallow with colored pencils
Swallows have been familiar to everyone since childhood. They build nests on country verandas and balconies of high-rise buildings. Probably many people have seen their chicks.
With the help of step-by-step instructions on how to draw a bird, the task will not seem difficult.
The main part of the swallow's body is no different from other birds. But the ponytail has a characteristic cut in the middle. The wings are also different - they are sharp and curved.
- Drawing begins with an image of a circle of the head. From the head, a body with a tail is drawn, reminiscent of a waving flag.
- The line indicates the division of the body into white and black. The bird's belly and part of its head are white.
- The unfolded wings are depicted in the shape of a sickle.
- A triangle is drawn - a beak and a black eye.
- The wings are being worked on - the plumage is indicated.
- In order to color a swallow, just a few pencils are enough: yellow for the beak, red for the color of the plumage in the lower part of the head, black for the rest of the part (except for the white part indicated by the border).
Respiratory system
The ability to fly was determined by the special structure of the respiratory system. The lungs are spongy and consist of alveoli intertwined with capillaries.
Some bronchi, without dividing into bronchioles, extend beyond the lungs and form air sacs in the body cavity. These formations provide breathing during flight.
Air enters the bags when the wings rise in flight, and when lowered, it is squeezed out into the lungs.
Night-bird. Drawing of an owl for the little ones
Children love to draw fairy-tale characters. This character is found in many cartoons, fairy tales, and educational programs. Probably every kid knows Aunt Owl from Winnie the Pooh.
- A large oval is drawn with a thin marker.
- Two large circles are drawn at the top of the oval - eyes. The owl is notable for the size of its eyes.
- In the middle of the circles, dots are drawn - pupils.
- The beak is depicted as a triangle.
- Ears are also drawn in the form of triangles. Tassels are added at the tips of the ears.
- The wings on the sides of the oval are in the form of droplets.
- The paws look like two branches with “fingers”.
- You can imitate plumage with waves all over the body or with many inverted “birds”.
- The body is colored with a pair of brown markers and the eyes with yellow.
This method is suitable for little ones. After all, all geometric shapes in the image of an owl are repeated.
The diversity of the class of birds is amazing material for a beginning artist. You can take your first steps into the wonderful world of birds!
Propulsion system
Birds' muscles allow them to perform complex movements with a high degree of coordination. The organs of movement of flying birds are wings.
The pectoral muscles are the most developed (up to 1/5 of the total body weight).
Birds that have lost the ability to fly have powerful leg muscles that allow them to run quickly on the ground.