Robot alien
Do-it-yourself space-themed crafts don’t necessarily mean rockets or planets. You can build a real alien robot. For this you will need:
- Two small boxes, one larger, the other smaller;
- Foil;
- Three rolls of toilet paper or towels;
- Colored paper and cardboard;
- Decor for decoration.
Progress:
- Both boxes should be wrapped in foil so that there are no bare parts left;
- Toilet paper rolls need to be painted in a suitable color or covered with paper. Two of them remain the same size, a part needs to be cut off from the third to make a neck;
- For the arms you need to cut out two strips and fold them with a spring. Colored paper or cardboard is suitable for this;
- Attach foil palms to the tips of your hands;
- Make eyes and a mouth on a small box, stick buttons on a large box, you can design a display, in general, create a robot’s body;
- Now all that remains is to assemble the robot. The head should be crowned with horns-antennas. To do this, you can take a spring or make them from foil.
Making from cardboard
Have you ever been given gifts in very cute little boxes? These could be cakes, cups, books. And now the time has come to pack these gifts. We will make a robot out of cardboard boxes.
How we will make:
- Our robot is made of metal. We will show this now: we wrap the boxes with foil.
- We cut toilet paper rolls to size: one piece for the neck, two pieces for the legs.
- We glue or paint the blanks.
- We fold the paper with a spring; see how to do this in the video. You need 2 of these parts. These are hands.
- We cover the edges of the “hand” with foil.
- We paste over a larger box with small parts - circles, rectangles, as if these were buttons on the robot’s body. We make holes.
- Draw a smile on the head and glue button eyes.
- We assemble the structure.
The final touch will be the wire antennas. Here they are made with a heart. You can twist small loops or glue stars. More options:
For different ages
It is advisable to choose which craft should be made, taking into account the age of the child. Of course, moms and dads will still have to help their child, but this should be his victory. Achievements are difficult to share among everyone, just like success, praise, and good grades.
Preschoolers can create figurines, paintings, and soft toys. It is worth paying attention to photo frames, greeting cards, stained glass, and Christmas tree decorations. But decorating covers for books and notebooks will not be interesting for children at this age, since reading and writing skills have not yet been developed or honed. Primary school students will like this idea more.
Crafts made from wood, wire, matches - “aerobatics”, an interesting task for children studying in the 5th, 6th, 7th or 8th grade.
Astronaut helmet
Very often in photos of space crafts you can see that some parents even build an entire astronaut suit for their child.
In fact, it’s quite easy to do, you just need to use your imagination. In addition, even the most unusual materials can be used.
To create a helmet you will need:
- A large number of newspapers;
- Balloon;
- Glue;
- Paints or colored paper to decorate the finished product. Foil may also come in handy.
Operating procedure:
- The helmet will be created using papier-mâché technique. For this purpose, a ball is taken to act as a mold. You need to inflate it to such a size that it forms the basis for the helmet. If the craft will then be put on the head, this must be taken into account;
- Then the ball is covered with newspapers in several layers, always leaving a hole at the bottom for the head. There is no need to leave an opening on the side; it will then be cut out of a single piece. Each layer must dry to make the structure strong;
- When everything is dry, you can deflate the balloon. The dense layer of newspapers will remain the same shape;
- Now you can cut out the hole for the face. You need to measure and draw it on newspapers, and then carefully cut it out;
- The next stage is decoration. The helmet needs to be painted several times or wrapped in foil. An insert is made for the hole from a transparent material or left empty.
The helmet for the costume is ready. If you wish, you can complete the remaining parts, or you can limit yourself to just this.
Volumetric craft with a rocket
For children's crafts, space, you can use plain paper. If you don’t want to make an applique and want to diversify the finished product, you can try the following option.
For it you will need:
- Colored paper or cardboard. It's better to take cardboard, it's denser. Or take colored paper and glue it onto some kind of base to increase the density;
- Sushi chopsticks or long skewers;
- Glue;
- A container where you can place the composition;
- Filling for the container. Plasticine or polyurethane foam will do - anything that can be used to fix the skewers so that they stand.
Progress:
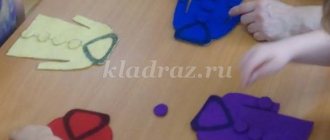
- Using the stencil you need to cut out several stars, a rocket and a planet. It is better to cut out two parts for each figure, so that later you can glue them together by inserting a base between them;
- If desired, the rocket can be decorated by gluing additional elements on it or drawing something;
- Then you need to glue the cut out parts onto a stick;
- Now all that remains is to install the figures in the container and fix them there.
The result is a rather interesting composition that can be brought to an exhibition or placed on a shelf as a decoration.
Kirigami postcard
One of the directions of origami is kirigami. This technique is needed to create very beautiful cards. Scissors are permitted.
Multidimensionality is easier to convey than it seems. There is no need to learn the rules for the placement of light and shadow on the canvas. If a child loves to draw and has artistic abilities, he himself will be able to develop them in the future, and kirigami will be an ideal start to work, a springboard for further improvement.
For production you will need:
- templates;
- paper;
- scissors.
The template indicates where the pattern will fold. They are arranged in such a way that the craft ends up being voluminous when the postcard is opened. When closed, the sheets fold neatly on their own. Ready-made templates can be downloaded online or purchased. You can draw them yourself. Video, master class will help you master the basic rules.
Rocket
If you are looking for how to make a space-themed craft, but don’t want to spend a lot of time and materials, then this option is for you. This craft will not take much time, and it is also quite easy to assemble.
And you need a minimum of materials for it:
- Cardboard base tube,
- Glue,
- Scissors,
- Paints
- Colored paper.
You can use several rolls of toilet paper or paper towels as a base. You need to focus on the size of the rocket.
- You can take one small bushing, then the craft will turn out to be small.
- At one end the sleeve is cut lengthwise into four parts. The cuts should be small, just to form a tapered end.
- After they are assembled together to form a cone, you need to secure them with glue.
- Now we need to do the base. You can skip this step, which will make your task easier, because the bushing is already quite stable.
- But with a base the craft will be more interesting. So, you need to make four cuts in exactly the same way at an equal distance from each other at the other end.
- From cardboard or paper, build a part in the form of a cross about three centimeters high. Then insert this part into the slots of the rocket.
The craft is almost finished. All that remains is to paint it or paste it with colored paper.
Drawing
Of all kinds of artistic creativity, the theme of astronautics is best expressed in a drawing.
You can depict a rocket, as well as spaceships, lunar rovers, satellites. Kids are just starting to use paints, but older children can do more serious work.
Preschoolers should be asked to draw a drawing of an astronaut in a helmet, a rocket, and the earth:
- We divide the sheet into three parts and roughly outline where the figures will be.
- On the right side we draw a large round head, a rectangular body, arms and legs in voluminous clothes.
- Inside the circle we draw a square - a spacesuit. Let's draw the person's face.
- On the left we draw a round earth. You can draw a circle according to the template to depict the continents.
- At the top of the picture is a spaceship, we draw it small, it is in the background, the child will do it himself: a triangle, a circle.
- A cord stretches from the ship to the astronaut’s spacesuit, draw a line. Our hero in outer space!
- You can decorate with colored pencils, crayons: Blue earth, a bright astronaut suit, everything is at the child’s discretion.
It is advisable to paint over the entire sheet of the drawing, without leaving any white spots.
With younger schoolchildren, you can depict more complex objects, use a palette, and mix paints.
Having depicted satellites, ships, planets with a simple pencil, you need to paint over them with suitable colors, in addition to this, we make the background of the picture from mixed colors, for example, blue, cyan, a little red, mix, paint over the surface, you get a mysterious space.
Or you can start the image not with objects, but with the background: paint a sheet of paper blue and purple, add blue, white, spray white, yellow paints, when dry, draw white objects on a beautiful background - an astronaut, a ship, a planet. The drawing is a miracle!
Plasticine crafts
Space crafts made from plasticine also look quite original. Everyone is familiar with the snow globe composition, when liquid is poured into a container and some objects are placed. You can repeat the same craft on a space theme.
For this you will need:
- Empty jar with screw cap;
- Plasticine;
- Glitter for decoration;
- Glycerin to create the substance;
- Wire for fastening.
Progress:
- First you need to sculpt the planets. They can both resemble real ones and be completely different, as much as your imagination allows. They must be both small and large, and not the same size;
- Now each figure needs to be strung on a wire, and its other end attached to the lid;
- To create the substance, you need to mix equal parts of water and glycerin. You can add a little more of the second ingredient, then the glitter will settle more slowly when you shake the jar;
- Pour glycerin and water into a jar, add glitter for decoration. Place the planet in a mixture of water and glycerin and screw the lid on tightly. You can gently shake the jar and see how beautiful the craft turns out.