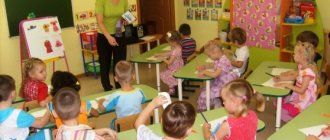
If you decide to take up drawing with your baby, remember that in the first years of life a little person actively learns and discovers the world around him. And drawing for him is also a kind of game, an experiment, a way of realizing his childhood fantasies.
After all, you can play not only with cubes and dolls. You can invent and draw interesting stories on paper, make paper clothes, beds and furniture for the same paper dolls, draw road maps for toy travel, etc.
Show your child as many ways of drawing as possible, and soon you will notice manifestations of his own imagination.
What do drawing lessons give a child?
- Your baby will develop fine motor skills and hand coordination, and this is directly related to the development of intelligence. This means that your child will learn to reason logically, he will have a good memory, attention and coherent speech.
- Drawing prepares a child's hand for writing.
- While playing drawing, the little artist will learn to distinguish colors and shades, size and number of objects.
- Not being able to express his feelings in words, your baby will be able to express them through creativity. Knowing this, psychologists successfully help children get rid of their fears through drawing.
What does the Internet recommend?
Since I touched on the topic of drawing with children of preschool age, let me recommend, in my opinion, excellent teaching methods that will help young mothers and fathers introduce their children to the wonderful world of fine art:
- “Drawing with young children: 1-3 years” - this manual contains effective recommendations for acquiring initial skills in working with a pencil, crayons, and offers standard and unusual drawing techniques;
- “Drawing with children 2-3 years old” - here are lessons for children in the form of notes, which will be equally useful for both teachers and parents. The emphasis is on children’s gradual mastery of different ways of depicting simple objects, including non-traditional techniques.
If you don’t have any time to do purposefully developing finger exercises with your baby, then I advise you to select toys in such a way that fine motor skills are trained casually, playfully, as they say.
For example, kids of all ages love Velcro construction sets. Cool and useful thing. Firstly, these prickly burdocks have an excellent effect on sensitive fingertips, replacing massage. Secondly, any construction set is a kind of simulator for developing imagination, dexterity, attentiveness, and patience. And then - crafts made from bright “burdock” are very impressive.
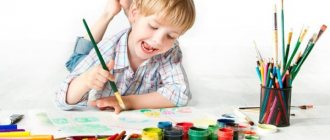
In order for a child to love drawing for life, you need to interest him by offering beautiful and convenient tools.
When to start drawing lessons?
Children develop an interest in drawing very early. They see how older children and adults draw and write, and try to imitate them. You can stimulate this interest and not wait for the child to ask you for pencils or paints, but specifically invite him to draw.
At first, let him just watch you draw. After all, his hands are still quite weak to hold a brush or pencil. From about 4 months, you can invite your child to paint with his fingers and palms. And when his hands get stronger, that is, closer to the second year of life, first offer him a brush, then pencils and felt-tip pens.
Don’t rush to teach your child to draw from the very first lessons. Let him just scribble funny doodles on paper. This is the first stage of drawing that your baby goes through. Experts call it the staining stage . Until about 2 years of age, your little artist will play with a pencil, simply scratching it on paper and not creating specific images.
At this stage of child development, you can teach your baby:
- hold a pencil, felt-tip pen, etc. correctly.
- draw points, lines, circles, ovals,
- paint over the shapes.
Our drawing lessons from 1 to 2 years. Part 1.
Drawing rain
An adult draws a cloud on a piece of paper. Invites the child to draw raindrops with his fingers. For drawing, use finger gouache (it is easily washed off both from your hands and from clothes).
Read the poem to your child:
*** Just cried - Laughs through tears. And in our yard - Rain and sun.
If only you knew, mischievous little one, how much you look like mushroom rain.
Some people think that if it rains mushrooms, then mushrooms fall to the ground. But no. It’s just that this rain is warm, gentle and helps mushrooms grow. See for yourself.
This is how it happened, our first rain (17 months)
(based on the picture, I didn’t have time to save the drawing with rain)
Just draw If your child is tired of markers, offer him paints or crayons. A very exciting activity is painting some things, painting images directly on the wall (you can hang a piece of old wallpaper or whatman paper on the wall), painting with finger paints. We draw on everything! On corrugations, tetra pack bags (covered with sheets), on walls (whatman paper, sheet), in the bathroom, on cut-out shapes, fabric, etc.
I drew on the wall (whatman paper) with my dad!
Let's hide the mouse, fish, bird...
Draw a mouse in the center of the sheet with a pencil or felt-tip pen. Show it to your baby. — Tell your child a short story. — Once upon a time there lived a mouse. This mouse loved cheese. And to get to the cheese, you had to run past the cat every time. The mouse was very afraid of the cat. And the cat was just waiting for the mouse to go get the cheese. So our mouse is going to get some cheese, and the cat is hiding and waiting. The mouse sneaks around quietly, but you can’t fool the cat! Oh, now the cat will catch up with the mouse! Where should our mouse go? - Let's help the mouse and hide it. - Give the child a pencil or felt-tip pen the same color as the mouse, offer to paint over the entire mouse (shade). But first, show me how it's done. - When the mouse is completely shaded, tell the kid that he did a great job saving the mouse from the cat.
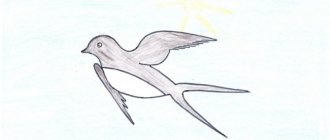
We also had a bird
Hiding the mouse
Draw strings for the ball
Inflate the balloon and, without tying it with a thread, give it to the baby. As soon as the baby takes the ball, it will immediately deflate. — Explain to the child that in order to prevent the balloon from deflating, you need to tie it with thread. - Inflate the balloon again and tie it with thread. — Show the multi-colored balls without strings drawn in advance on a sheet of paper. — Invite your child to add strings to the balls. But first, show me how to do it. Place the pencil on the “tail” of the ball and move it down. Then take the baby’s hand and together with him draw another thread to the ball. - Now invite the child to try to draw the strings himself. And don’t forget to praise your child for his efforts and perseverance. - Now play with the baby with a balloon. You can knock the ball up, you can throw it to each other
Unfortunately, I found only this photo in the “Archive” and there were many of them
Icicles
Cut icicles out of white paper in any shape and stick them on a sheet of paper of a different color (to the top edge of the sheet). - Give the child a brush (soft) and white gouache. Let him draw droplets that flow from the icicles. — We will paint the droplets by dipping the brush. You can tell your child that our brush will happily jump on a sheet of paper: One-jump, two-jump, you get droplets!
Kalyaki-malyaki
Purpose of the lesson: To teach the child to hold a pencil or felt-tip pen correctly; see objects in lines and intersections; developing interest in drawing. Materials for the lesson:
pencils (wax crayons can be used) or felt-tip pens. A sheet of paper of any size (you can even use Whatman paper).
Progress of the lesson:
It is best to draw where the child will feel comfortable and relaxed. (It is advisable to wait until the child himself says or lets him know that he wants to draw).
- Look what I prepared? – correctly, this is paper (leaflet) and pencils (felt-tip pens). - What are we going to do with you? – we will draw correctly.
Let the child draw as much time as he wants, don’t stop him. When the drawing is finished ask him what he drew. If the child himself does not know what it is, offer him several options:
— Maybe it’s raining? – let’s finish drawing the cloud (finish it yourself). - Or maybe this is a house? - let's finish the roof. - Or maybe it’s a fish? – let’s draw her eyes, a tail, etc.
Here's what might happen:
* The purpose of such activities is to teach children to see images in lines and their intersections. Such activities will help the child move to another stage of drawing. Otherwise, children can stop at the scribble level for a very long time - they are satisfied with the way they draw.
Fantasize.
Purpose of the lesson:
Teach your child to see an image on paper.
Develop an interest in drawing. Material for the lesson:
pencils (wax crayons are possible) or felt-tip pens. Paper.
Progress of the lesson:
It is better to conduct the lesson at the children's table, but you can draw while sitting on the carpet. In this lesson you will draw more, commenting on each stage of drawing. The child will observe and prompt. And if he wants, he will draw with you. Invite your child to draw and choose any subject together. The plot must be close to the child and interesting to him. Your baby can take part, telling you what to draw and which pencil to take. We perform this task on the easel. Yurashik loves to draw like this.
You can use poetry when drawing, for example:
But here are the four sides - we drew the Square. From the square we will now have a House.
Well, what is a house without a roof! Here it is lower, here it is higher. If the house has a fireplace, the Turret is visible above it.
To make our house bright, let's draw windows in it.
Draw the door, my friend - You can now enter the house. And of course, we will certainly build strong walls.
Draw the roof quickly, And then - a chimney on it, Above the chimney - a column of smoke, We cover the house with tiles.
Let's draw windows in the house, a beautiful entrance door. There is a sign on the door to know who lives here.
So, smelling the aromas, the guys gathered in the kitchen. We can draw skillfully! Here is a stove, and in it is an oven.
On the panel there are knobs and buttons, on top there are round burners. Now, to the delight of everyone, the slabs are completely flat.
In the kitchen there are forks, spoons, teapots, plates, bowls, cups, saucers and knives... What have you forgotten? Tell me!
House by house... Look - the city has grown on the page! Margret Rettich
***** I draw walls, roof, windows, vents, porch... They shout to me, but I don’t hear, I draw a ring pond. The garden is closer to the water, there is an apple orchard nearby... They shout to me, but I don’t hear, I’m painting the heavens. And then in the corner, higher up, I’ll draw a red circle... They shout to me, but I don’t hear, I paint the meadow. They shout at me, but I don’t hear. That is, I hear, but I am silent. I draw what I see - I don’t want to be distracted! Katso
Sticks.
Purpose of the lesson:
Teach your child to hold a pencil (felt-tip pen) correctly in his hand;
draw sticks - straight vertical lines. Develop an interest in drawing. Materials for the lesson:
pencils (wax crayons can be used) or felt-tip pens of different colors, a sheet of paper. Various sticks.
Progress of the lesson:
It is better to conduct the lesson at the children's table. Prepare several different sticks in advance to show your child. These can be twigs, counting sticks, Chups sticks, cocktail tubes.
- Look what this is? - These are sticks. - Look how different they are: long and short, thick and thin. But they are all straight and even. - Let's try to draw a stick in the air.
(take the child’s hand and draw a line in the air).
- Now let's draw a stick on a piece of paper.
- Look how I draw. First, draw a stick on a piece of paper and let your child look.
- Now take the pencil you like and draw a stick too.
(For a child to learn to draw correctly, you need to show the process of drawing a stick by moving his hand).
- Now let's draw only short sticks.
- And now the long ones. - And now only blue (red, yellow, etc.) If the child is not tired, invite him to draw lines connecting the dots.
Flower meadow.
Material: Special paints for painting yellow, red, blue, orange; diluted gouache or watercolor; a sheet of light green paper; water; cloth, napkin. Oilcloth.
Technique: Finger painting.
Progress of the lesson:
Before the start of the lesson, prepare the paints: dilute them to the thickness of sour cream and pour them into separate saucers or cups. Prepare a jar of water in which the child can rinse his fingers.
- Today you and I will go to the clearing to admire the flowers.
Place a sheet of light green cardboard on the table. - But what is it? The flowers did not bloom in the clearing. Let's help them. Remind your child how to paint with his fingers: dip the tip of his finger in the paint, then touch it to the paper, then dip it in the paint again, etc. Remind that flowers come in different colors. Give your child the opportunity to draw on their own.
We often combine several techniques!
Applique and drawing. Firework .
Goal: To teach children to paint with their fingers; develop interest and a positive attitude towards drawing.
Material: Special paints for painting, diluted gouache or watercolor; paper; water; cloth, napkin. Oilcloth.
Technique: Finger painting.
Progress of the lesson:
During the lesson, 2-4 paints of different colors are used, for example, blue, green, yellow, red. Before the start of the lesson, prepare the paints: dilute them to the thickness of sour cream and pour them into separate saucers or cups. Prepare a jar of water in which the child can rinse his fingers.
- Remember, you and I saw the fireworks? There were many small colorful lights. - There were very, very many of them. They looked like small multi-colored circles.
You can read a poem, for example, like this:
Firework
There are three fountains in the black sky, Bright, fiery tulips. Sparks opened like flowers, and melted so quickly!
Again: “Bam!” - as bright as day, the sky glows with fire. Red, yellow, white, blue - A hundred stars and a hundred lines.
I'm ready to watch the fireworks for one hundred minutes and one hundred hours. If only there were fireworks every day - One hundred hours and one hundred minutes.
Ana Trofimova
- Let's draw fireworks!
Place a sheet of paper on the table and show how you can paint with your fingers: dip your fingertip into the paint, then touch it to the paper, then dip it in the paint again, etc. When your child gets tired of painting with one color of paint, explain that he needs to wash his finger in the jar and wipe it with a napkin. Give your child the opportunity to draw on their own. - What a beautiful fireworks display you made! Well done!
Drawing on wet paper.
Progress of the lesson
Your child will get an unforgettable and unusual feeling while painting with watercolors on wet paper. The child gets the opportunity to simply tinker with paints. When drawing on a wet sheet, we are not talking about drawing something specific.
Place an oilcloth on the table or floor. Wet a thick sheet of watercolor paper (dip it in a basin of water) and place it on the oilcloth, smoothing it with a wet sponge.
Dip a brush into any paint and brush it over the paper. Do the same with paints of other colors.
Draw the child's attention to the fact that the image is blurry, as if in fog or rain. And if you tilt the sheet, the paint will flow down the sheet and you will get a new pattern.
When the paints have dried, you and your child can try to figure out what the drawing looks like.
Invite your child to make a drawing on a wet sheet themselves. You can draw with brushes and fingers.
The resulting drawing can be used as a basis for appliqué.
Drawing techniques:
Drawing on wet paper –
applying paint to a sheet previously moistened with water. This results in a plotless drawing in which you can observe blurry outlines, smooth transitions, and mixing of colors.
Finger painting
- applying paint to paper using your fingertips. It is convenient to draw with the tip of the index finger of your dominant hand. When a finger touches the paper, fingerprints remain on it in the form of round colored spots, and when it is drawn across the paper, lines 3-6 cm long are obtained. Special paints, gouache or watercolor are used. The paints are diluted to the consistency of sour cream and poured into flat lids. When changing colors, wash your fingers in a jar of water and wipe with a napkin.
Painting with a brush
is
applying paint to paper using a brush. In this case, you should first wet the brush, then take the paint on it and lightly, without pressure, apply it to the paper. This technique uses brushes - round and flat, paints - watercolor and gouache (watercolor in tubes is pre-diluted), paper - watercolor and other thick paper. You can paint with a brush in three ways:
• dabbing - applying colored spots to the base by applying a brush with paint to the paper. After contact with the paper, the brush should be immediately torn away from it, without making strokes;
• applying strokes - drawing with a brush by drawing lines of various lengths in different directions (top to bottom, left to right, etc.);
• painting with a brush over a pencil sketch - applying paints over a simple pencil sketch consisting of simple lines and shapes (straight vertical and horizontal lines, circles, semicircles, ovals).
Drawing with a stamp
- applying paint to the surface of a special shape (stamp), applying the stamp with a layer of paint to the paper and pressing it to obtain a color print. One or more colors can be applied to a stamp. Using this method, you can obtain identical prints in any quantity, and create different images from prints of the same and different shapes. As stamps, you can use wooden geometric figures from a toy construction set or cut out templates of the desired shape from vegetables (carrots, potatoes).
Our favorite stamps! We've been looking for them for a long time!
1. Colored water
Target:
Introduce children to watercolor paints; teach how to dilute paints in water; use a brush; consolidate knowledge of flowers; develop interest and a positive attitude towards drawing.
Material:
Sets of watercolor paints; medium-sized transparent plastic cups; round brushes; water; cloth, napkin.
Progress of the lesson:
Place glasses in a row on the table and fill them with water. Take paint of one of the main colors on a brush and dilute it in a glass of water. In this case, you can dilute the paint quickly by stirring the water with a brush, or you can lower the brush into the water and immediately remove it, in this case the cloud of paint will gradually dissolve in the water.
- Now I’ll take yellow paint on the brush, like this. And now... I lower the brush into a glass of water. I wonder what will happen? Look how beautiful it is!
Thus, in front of the child’s eyes, mix paints of several colors - yellow, red, blue, green, white.
Give your child paints, brushes, and glasses of water. Offer to choose the paint you like, take it with a brush and dilute it in water.
— What paint did you take? Dip the brush into some water.
— What color did the water become?
- This is some beautiful colored water we made!
2. Mix paints
Target:
Continue introducing watercolor paints; learn to use a brush correctly; consolidate knowledge of basic colors, introduce new colors and shades; develop interest and a positive attitude towards drawing.
Progress of the lesson:
Derived colors are obtained by mixing pairs of primary colors:
Blue + yellow = green
Yellow + red = orange
Red + blue = purple
By changing the proportions of mixed paints, you can get different shades of colors. A variety of other colors can be obtained by mixing three primary colors in different proportions. Without teaching children color theory, in class you can give them the opportunity to experience the magic of the appearance of new colors. You can mix paints of primary colors in different ways. During one of the “Colored Water” classes, pour water of different colors into one glass or mix several colors alternately in a glass of clean water. You can mix paints on a palette or on paper.
We can't do this job! Yurashik mixes all colors with black!
How to teach a child to hold a pencil correctly?
A correct three-finger grip needs to be developed gradually. And you can start long before the baby starts drawing with a pencil.
First, the child learns to grasp objects with his thumb and forefinger. This skill is formed at approximately 9-10 months. Special games will help him develop.
- With loose objects - mosaics, small stones, buttons, beads. You can simply sort them out, or you can place them in containers with two fingers.
- With clothespins. Cut out various shapes from cardboard (for example, a Christmas tree, a hedgehog, the sun, etc.) and invite your child to attach clothespins to them. Clothespins can also be attached to the rim of a bucket, to each other and, of course, to clothing and rope.
- With tweezers. Teach your child to use tweezers to transfer small toys, pieces of foam rubber, and pasta from one container to another.
When small fingers can easily perform these manipulations, begin to form a three-finger grip. To do this, use the following tips:
- Regularly place the pencil in your fingers correctly. But don’t do it too annoyingly, otherwise your baby will become uninterested in drawing.
- If you give a small piece of pencil or chalk, the child simply will not be able to hold it with his fist and will take it exactly as he should hold a pencil or pen - with three fingers.
- Buy a special triangular rubber tip for pencils and brushes or thick pencils with a triangular cross-section. Round pencils are difficult for children to hold.
- After 3 years, you can show your baby the next technique. Place the pencil point down on the table and hold it with your left hand. Fold the three fingers of your right hand into a pinch and place them on the top of the pencil. Now slowly move the pinch down the pencil. When your fingers are almost at the stylus, they will definitely take the correct position.
Let's talk about the misconceptions of some parents
From my observations and experience, I can note that some parents of newborn children go to two extremes: either they begin to actively engage in the development of the baby from the very first days, or they completely ignore the capabilities of children at an early age, hoping that in kindergarten teachers will fill in all the gaps.
The first type of mothers themselves collapse from fatigue and overload the child, trying to raise child prodigies, absolutely not taking into account the age-related physiological and emotional characteristics of newborns. The second type focuses on satisfying the natural needs of children, but misses valuable time for the development of the mental and emotional sphere.
1-3 years is a fertile period for laying the foundation for the child’s further growth in all directions. You need to understand that the golden mean in the approach to raising children is important: we begin to introduce them to the environment, develop the simplest skills, develop memory and thinking. This, of course, parallels physical development.
But everything should happen gradually, with joy and pleasure for both sides of the process - mother and child. We cannot imagine how sensitive newborn children are to the mood and emotional state of the mother. If the mother is irritated, tired, and works with the baby with force, then this will not bring any benefit to the child.
If you can’t plan your day in such a way as to find time for a fun, quiet 15 minutes of playing with your son or daughter with finger paints, for example, then it’s better not to bother. In a hurry and irritation, the result will be one negative thing and the baby will not want to draw for a long time, remembering how this activity irritated his mother.
The most correct and competent option is to plan activities before the baby is born. While on maternity leave, read methodological literature, draw up a schedule of games and activities for the first time, make an approximate daily schedule. You will already get used to the role of a good, calm and balanced mother. Of course, life makes its own adjustments to our plans and schedules, but planning greatly organizes a person, I know from my own experience.
Choosing pencils and markers
So, short and triangular pencils will teach your baby to hold them correctly.
In addition, the first pencils for drawing should be very soft so that they can leave a mark on the paper without strong pressure. These can be wax and plastic pencils, water-based pencils. They are easily sharpened with ordinary sharpeners, leave soft and even strokes, and the designs are rich and bright. Such pencils do not stain your hands, are easily washed off clothes, and have no odor.
And of course, your baby can easily draw with felt-tip pens. Now on sale there are harmless markers with ink based on food coloring. They also sell felt-tip pens that can be easily washed off your hands and clothes.
Diligent and neat children
Children with anal vector are calm and diligent. They try to do everything perfectly and bring the job to the end.
Such a child is not very confident in himself and is slow in action. He needs to be encouraged more often, praised for a job well and carefully done. He will prefer to paint with paints (watercolors, gouache), sculpt figures from clay, dough, make crafts from paper - in general, everything where his love for painstaking and detailed work will come in handy.
A child with an anal vector wants and intends to do his job better than anyone else. Tries to do everything correctly and perfectly. But if the child is not confident in his success, he may flatly refuse to do the work or crumple, tear the drawing, or break the finished work made of plasticine or paper.
Cutting out pictures from magazines or postcards and coloring ready-made coloring pages to create a collaborative collage equalizes children and allows even very insecure kids to join in the work.
Irrepressible dreamers
Children with a visual vector want to draw animals, favorite fairy tale characters, or something “pretty” and colorful. They are very emotional and sensitive. These children love to draw and have great imagination. They express their feelings easily.
They can communicate with their drawn character, talk to him, feed him, get angry with him, be afraid of him (some kind of drawn “byaku-buku”).
Visual children like delicate colors: pink, blue, turquoise, lilac. They love to draw animals and toys. Girls - princesses and castles. Boys - the underwater kingdom, overseas countries.
Visual arts classes can develop these children into future artists, designers and art critics. And in general, they provide skills of creativity and self-expression, which are as important to the viewer as air. Drawing also inoculates them against fears and phobias. Do not take away a brush or pencil from a visual child, do not scold him for drawings on wallpaper or other creativity - this can lead to delayed mental development and negatively affect his fate.
Where to start drawing?
First, show your baby how to use the new item correctly. Draw something simple and understandable to the baby - lines, simple figures, a house, a cloud, the sun. After this, give the child a pencil and be sure to praise him if he draws at least a couple of strokes or dots.
Take the baby's hand in your hand and slowly draw together with him, first straight and wavy lines, circles, ovals, then gradually complicate the image. This way you will help your child master basic movements faster and use his muscle memory.
The lesson will be interesting and educational if you read poetry or sing a song and at the same time draw what you are talking or singing about. The more songs, poems, fairy tales, and jokes you know, the easier it will be for you to come up with a plot for the drawing.
Don’t forget about Suteev’s fairy tales “The Mouse and the Pencil”, “The Rooster and the Paints”, “The Capricious Cat”. All kids, without exception, love these fascinating fairy tales in pictures. In addition, they show step by step how to draw, for example, a cat.
Some more advice for concerned parents
Do you know what a big step in development for a baby is the first line on paper with a pencil? This is like man's first step in space, no less! A particularly valuable stage is when the child begins to “read” his drawing, moving from chaotic strokes to the same strokes, but meaningful. Kids depict many things in the same way - now it’s grass, now it’s a tree, now it’s an uncle.
Children of pre-Sadovo age perceive a drawn image as a real object or being. The change in doodles is directly related to changes in the psyche, its maturation. It’s not for nothing that psychologists work on children’s drawings, since this is a window into the world of a child who cannot express his experiences in words.
An adult plays a major role in a child’s life, so at an early age the main way to teach drawing and other types of creativity is demonstration. This means that you show and help your child draw. Move it with your hand and strengthen your motor skills. I repeat that we comment on all movements using auditory and visual memory.
Remember that at an early stage in children’s lives, the goals are: to arouse a strong interest in creativity and to instill skills in working with tools and materials. It is important to initially teach how to use the tools correctly, for their intended purpose, but gradually, as they grow older, to introduce new and non-standard techniques and materials.
Learn to draw lines
In order for the child to be able to draw what he has in mind, he simply needs to learn how to draw a variety of lines with a pencil - straight, wavy, close them into a circle, oval, etc. And if it costs us, adults, nothing to draw any line with a pencil, then for a child it is real work. The child has not yet learned to control hand movements and it is still difficult for him to handle writing instruments.
So one of the first things you can teach a young artist is to draw lines. To do this, invite him to play the following games.
"Connections". This game not only gives you the opportunity to practice drawing straight lines on paper, but also develops logical thinking. You need to prepare for it in advance. Draw or stick images on a piece of paper and ask your child to connect them with lines, following a certain logic. You can give your child the following tasks:
- Connect identical butterflies (cars, flowers, berries...) with lines.
- Connect cookies of the same shape with lines.
- Connect the fruits to the plate with lines.
- Connect objects of the same color.
You can gradually make the tasks more difficult.
“Complete the picture.” Invite your child to fill in the missing details. Let them be just straight lines at first, for example:
- mushroom stems;
- umbrella handles;
- tree trunks;
- rays of the sun, etc.
Let the baby connect the flower heads with the vase, the balls with the man’s hand.
Draw a cloud and make it rain with your child. Draw the ground, and let the child draw the grass.
Stencils. Teach your child to draw using a stencil. Nowadays, stores offer a wide selection of stencils on different themes - animals, vegetables, fruits, sea creatures, etc. You can also use the edges of a sorter cube as stencils.
This activity trains muscle memory. By tracing stencils, the child learns to draw closed lines and shapes.
"Circle the object." Place cups, cubes, frames and inserts on a piece of paper and trace with a colored pencil. Then match the corresponding object with the figure drawn on the paper. This game teaches you how to trace flat shapes, as well as relate a flat image to its outline.
And of course, don’t forget to trace your baby’s hands - this activity brings great joy to little artists.
"Paths". Draw paths on paper - two parallel lines. Invite your child to first trace them with his finger and then run a pencil over them.
You need to trace with your finger so that the baby understands the task. It also develops muscle memory. If you remember, at school students first write letters and numbers in the air with their hands and only after that - in their notebooks.
To make it interesting for your little one, come up with a plot. For example, draw a ladybug at the beginning of the path, and a house at the end. Now, together with your child, help the ladybug get to the house. You can also help the truck get to the garage, the ship to sail to the island, and the butterfly to fly to the flower.