Nitography is a drawing technique for children where woolen threads are used to embody an artistic image. The design can be made in several ways: by soaking the threads with paint and sliding it over the paper, laying out the appliqué according to the pattern, and also using stamps. In kindergarten, classes on non-traditional drawing techniques are held in the middle and senior groups, that is, with children 4–6 years old.
What it is
Nitcography (a combination of the words “thread” and “grafo” - I write, that is, “I write with thread” or “I draw with thread”) is the creation of paintings using threads.
Nitography is a type of fine art that allows you to create bright and expressive images
The main goal of artistic and aesthetic education of preschoolers is to awaken children's interest in visual arts. As for the purposes of using non-traditional drawing techniques, in particular, nitcography in the older group, these include
- developing the ability to select a color palette to reveal the meaning of the plot of the drawing;
- develop the ability to see a whole image from its individual elements;
- improve fine motor skills;
- foster a positive perception of the creative process.
Drawing an image
Children immediately begin to see the most incredible images in them. All they have to do is fill in the missing details. For this you can use the same paints, pencils, crayons and markers. Looking at how children widely use their internal capabilities, we can remember that once upon a time everyone had such potential. That is why it is recommended that adults not only teach children the technique of drawing with thread and paint, but also join them themselves in order to reawaken their dormant imagination. In addition, over time, adults get used to performing the main type of their work mechanically, which interferes with the development of not only creative potential, but also motor skills. When using this technique, the brain will have to use those parts of itself that have long stopped responding to the outside world - the parts responsible for the joy of creativity.
Types and techniques of nitcography used in kindergarten
There are 4 types of visual arts using threads.
Option No. 1 - actual nitcography
A type of technique with which children begin to get acquainted with the visual possibilities of threads. This usually happens in the middle group.
What do you need:
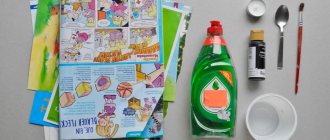
- woolen threads (the more fleecy it is, the more intricate the image will be);
- paint (gouache or watercolor);
- 2 sheets of thick paper (watercolor sheets are ideal, but regular sheets are fine).
Instructions:
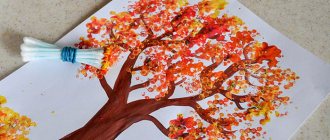
- Take a woolen thread 40–60 cm long.
- We dip it in paint (gouache is more convenient to use than watercolor), leaving a clean tail.
- Place it on a sheet of paper (it’s better to take thick paper).
- Apply a clean sheet and press down.
- Without opening the top sheet, we move the thread left and right by the tail.
- Remove the top sheet and remove the thread.
- We complete the patterns left by the thread, inventing images.
This is interesting. The base sheet can be folded in half and the thread covered with half, then the pattern will be symmetrical.
Gradually, the technique can be complicated with several threads dyed in different colors.
Video: how to work using the nitcography technique
Option number 2 - thread writing
In this case, you need threads of different colors, textures, glue (PVA or silicate) and a sheet for the base.
This is interesting. Thread painting can be done on fabric, then the threads are simply laid out on the base. No need to use glue. Only the pictures will be temporary - until the threads fall off.
Instructions:
- On a sheet of paper we draw the outline of the plot of the picture (you can use your own, or you can take a regular coloring template).
- Apply glue along the contour.
- Before it hardens, lay out the thread and press lightly so that it sticks.
- Now we fill the pattern element by element with threads of suitable colors.
The technique can be complicated by the way of laying out the threads:
- in a spiral;
- round;
- straight lines;
- zigzag lines, etc.
Video: learning to draw with threads on fabric
Option No. 3 - applique with threads
As a type of thread painting, instead of whole threads, pieces are used, that is, the threads are cut into small pieces, with which the space of the drawing is filled. This method is considered more convenient when working with younger children. In addition, it does not require much time to complete the task.
This is interesting. Familiarity with thread painting with a single thread usually occurs in the senior group, while mastering the technique from pieces is used in the middle and sometimes in the second junior group (only as 1-2 additional elements of the composition).
Option No. 4 - isothread
This technique of nitcography is not used in all kindergartens due to the fact that children have to work with sharp objects. Usually, isothread is the prerogative of preschool institutions with an artistic and aesthetic orientation. Mastering this type of thread printing technique begins in the senior group.
For the basis of the drawing using the iso-thread technique, you need to take medium-density cardboard
What do you need:
- threads;
- buttons in the form of studs;
- tablet;
- drawing on paper;
- scissors.
Instructions:
- We attach a drawing to the boards (can be from a coloring book).
- We insert studs or pins along the contours of all elements.
- Carefully, so as not to pull out the carnations, remove the paper sample.
- We wrap the carnations with threads, making two turns around each, and stretch the threads well.
This is interesting. As a simpler option, holes are pierced along the contour of the design, into which children pass threads with a needle.
Filling the arc
When embroidering floral patterns or other rounded shapes, it may be necessary to fill the arc. The filling of an arc is a derivative of the filling of a circle and largely obeys the same rules. You can draw an arc either by hand, using a compass to draw curls, or using a pattern.
You will have to place the dots “by eye” or also using a compass, so before piercing it is better to apply pencil marks. To make the task easier, you can download templates with numbers and print them. When making stitches, you need to move in one direction.
A spiral is also embroidered using a similar principle.
Having studied the basic techniques, you can move on to more serious work and begin to embroider first light paintings, and then complex compositions.
Scheme for compiling lesson notes for the senior group
A successful lesson plan is the key to successful activities for children. You need to start working on your notes by describing the goals and objectives of the lesson. In addition to the general purposes of using this technique in the senior group, we can highlight
- systematization of knowledge about obtaining shades by mixing paints;
- fostering a tolerant attitude towards the creative process.
Objectives are formulated based on the topic of the lesson. In general, the “skeleton” looks like this:
- develop memory, thinking, creativity;
- expand your understanding of the world around you;
- work on developing imagination.
Once goals and objectives have been identified, it is necessary to clearly distribute time between all stages of work on the topic.
It is important that children have enough time to complete the thread drawing.
A kindergarten lesson lasts 30 minutes. During this period, the teacher must work through 3 stages with the kids.
- Introduction (about 5 minutes). Includes motivational techniques: reading fairy tales, showing an excerpt from a dramatization, learning songs/poems, etc., depending on the topic of the lesson.
- The main part (about 20 minutes) is work on the drawing, physical education and finger gymnastics.
- Conclusion (about 5 minutes). It involves adults’ approval of the children’s work, as well as children’s reflection, which can be in the form of answers to the questions: “Did you like drawing with strings?”, “Do you think your drawing was a success?”, “Whose picture do you like more than others?” etc.
Example of a summary
Daria Muravleva “Summary of a lesson in visual arts for the senior group on the topic “Flowers for Mom” (Nitcography technique)” (fragment)
| <...Today I offer you an unusual way of drawing. You've never drawn like this before. Want to try and learn? It's called "nitcography". (Drawing technique is shown) - Take a thread, and now, using circular movements from the center in a spiral, lay the thread on a sheet of paper. Now you need to dip the thread into the chosen paint, holding the end of the thread, carefully helping with a brush, roll the thread onto a piece of paper in a spiral, as you did with dry thread. We direct the end of the dry thread downwards, holding it in the right hand, and with the palm of the left hand, pressing lightly, slowly pull the thread out from under the palm. Magic happens! Want to try it yourself? First, wake up your colors, but not all of them, but only those that are suitable for your unusual flower. – Try it and let’s see if you can do magic? I'm sure it will work! (Children do the work) As the children complete the task, I admire the bright colors they chose and the successful manifestation of their magical skills, and while they dry out, turn into flowers themselves and play a little...> |
Long-term plan for thread printing and thread writing
A long-term plan for non-traditional drawing techniques helps organize children's work by combining the topic of the lesson with a suitable technique for depicting it. The plan form is standard. Usually indicated
- month of work;
- topics of classes and drawing techniques;
- goals of using the methodology;
- sources that describe in detail the progress of work on this technique.
There is a separate column for notes, in which the teacher makes notes regarding work with a specific group.
Since when working in the technique of thread printing, the subject of the drawing is revealed after the image is received, it is difficult to integrate the technique into the general theme of the classes. In the middle group, thread printing and thread writing are used in those classes in which the “technique” column is marked “various.” As a rule, these are topics related to natural phenomena (rain, snow), creating patterns, for example, for a vase, etc.
In the older group, non-traditional techniques with threads are usually devoted to classes on a free topic or lessons dedicated to talking about dreams, fantasies, in other words, abstract topics.
Elizarova Olga “Perspective planning for drawing (senior group)” (fragment)
| <…MAY “Land of Colorful Dreams”. Goal: to consolidate the ability to use non-traditional techniques – drawing with “threads”...> |
As for thread painting, it is used in those topics where it is possible to use ready-made templates for coloring or abstract drawings.
Alekseeva Nadezhda “Perspective work plan for non-traditional drawing in the senior group” (fragment)
Drawing with colored threads
Goal: to introduce children to the technique of drawing with colored threads, to develop fantasy and imagination, and to cultivate accuracy. |
Going on a free voyage
All types of embroidery have something in common using similar stitches or entire seams. This invariably leads to experiments in mixing different techniques. Manufacturers offer ready-made sets in which a counted cross is combined with beads or ribbons.
Mixed techniques always look fresh and original.
There are a number of programs for creating circuits; they are written both in Russia and abroad. The first place in popularity among them is occupied by Pattern Maker (usually indicated by PM and the program version number). It is mainly used to create patterns for cross stitch, but it also creates patterns for tapestries, beads and mixed techniques.
The video shows how you can create a simple pattern in Pattern Maker.
Various types of thread embroidery are an excellent hobby that captivate not only women, but also men. Once you master the basic techniques, you will be able to create unique things. Clothes, accessories and handmade paintings will be in price at all times.
Stages of working on a drawing using the nitcography technique
"Goat"
For this drawing, children must turn the thread in a certain pattern.
The unusual thing about this drawing is that the children receive a task in advance: they need to draw a Dymkovo toy - a goat.
Instructions:
- “Look carefully at the Dymkovo goat, determine in which direction the thread should be turned by the upper tail, and which by the lower one (top - to the right, bottom - to the left).”
- “We cut the thread about 40 cm.”
- “Pour some gouache into a plate and dilute it with water.”
- “We dip the thread, holding it by the upper and lower tails.”
- “We apply the thread to a sheet located horizontally in front of you.”
- “Cover with a clean sheet and, holding it with your left hand, move the upper tail of the thread to the right with your right, and then the left tail to the left.”
- “Remove the top sheet.”
- “Using a black pencil, we draw the contours of the goat, the outlines of the muzzle, nose, and mouth.”
- “We outline the contours with a brown pencil.”
This is interesting. The above example can be worked on with children who are already well acquainted with the technique of making drawings using thread printing, since according to the instructions, children draw the plot as if “blindly”. Easier options are creating flowers, butterflies, etc., that is, those subjects that are invented on the basis of ready-made patterns made randomly with threads.
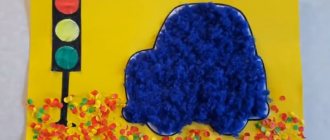
Photo gallery of drawings using the technique of nitcography
It’s very interesting when children come up with names for their pictures themselves.
To make a butterfly, you can take 1-2 colors to dye the threads, and paint the remaining shades along with the body
With the help of thread printing, children get ideas about different color combinations
Handicrafts using floss threads
Such threads were invented at the end of the 18th century. The Frenchman Dollfus treated cotton with lye. The result was light, silky and slightly shiny threads.
Their important feature is high-quality coloring. When buying floss for sewing, you can see that the threads are not twisted and are easily divided lengthwise into thinner ones
Floss color card
Nowadays threads are made from many natural or artificial materials. Each manufacturer has a color card that allows you to choose the desired shade from dozens of possible ones.
Choosing floss
These threads are used for cross-stitching on canvas. Beautiful pieces are created using satin embroidery floss.
Stages of working on a drawing using thread writing technique
Let's give an example of working in the thread writing technique using whole thread and pieces.
"Flowers"
For drawings with threads on colored paper, it is better to use silicate glue so that there are no marks left after drying.
Instructions:
- “We place a sheet of green paper vertically, and use glue to make a “path” for the stem of the flower.”
- “We take a green thread and lay out the stem with it.”
- “We make large drops of glue and put leaves on them, placing the threads in a circle, as if wrapping a ball.”
- “Again we make large drops of glue, distributing it evenly over the entire area of the bud of the future flower.”
- “We fill the element with pieces of thread, laying out first one layer, and then the second in the other direction.”
- “Add a couple of green threads for the calyx of the flower.”
Photo gallery of drawings with solid thread
The house and tree can be made without pre-applied contours
In this drawing, folding threads in a spiral and in a circle is practiced.
Such plots do not require small folds on the threads