Specific options within the theme “Birds”
According to T. Komarova’s fine arts program, in the preparatory group two lessons are devoted to drawing birds: this is drawing an illustration for the work of Mamin-Sibiryak “The Gray Neck” and “The Magic Bird”. However, the topic of birds is so interesting and multifaceted that the teacher clearly should not limit himself to only this. So, options for the feathered theme could be as follows:
- Owl-owl (a very bright image that can be depicted in different techniques).
- A flock of migratory birds (theme is proposed in autumn or spring).
- Cockerel is a golden comb (can be associated with some fairy tale, for example, “The Cockerel and the Bean Seed” or “The Tale of the Golden Cockerel” by A. S. Pushkin).
- Titmouse (you can draw on November 12 or not far from this date, when people celebrate Titmouse Day).
- Bullfinches on a branch (of course, this theme is offered in winter).
- Swallow (it’s good to connect the image with the fairy tale “Thumbelina”).
- Poultry (poultry yard as an option). A child can simultaneously portray a chicken, a rooster, a duck, a goose, a turkey, or one or the other.
- White-sided magpie.
- Swan on the lake (as a variant of the swan princess of A.S. Pushkin before her transformation into a girl or an illustration for Andersen’s fairy tale “Wild Swans”).
- Kargopol birds (drawing based on folk toys).
- Fairytale bird (Firebird).
Older preschoolers always find collective compositions interesting. The “Magic Bird” work is popular, when each child paints a feather to his own taste, and then a gorgeous tail is assembled from them (the teacher prepares the base in advance - the body of the bird).
Each child paints the feather according to their wishes, and together they make up the original tail of a fairy-tale bird.
Here again, you can take an individual approach and invite some children to color two feathers.
Another option for joint creativity is “Birds at the feeder.” The teacher draws a tree with branches and a feeder, and preschoolers complete the composition with birds.
The theme “Birds” encourages the creation of collective compositions
Sample summary of a drawing lesson in the middle group “Ducklings and Chicks”
Svetlana Burova
Sample summary of a drawing lesson in the middle group “Ducklings and Chicks”
Sample summary of a drawing lesson in the middle group “ Ducklings and Chicks ”
Type of activity : drawing
Lesson topic : “ Ducklings and chicks ”
Program objectives: To clarify children’s understanding of the appearance features of poultry. Continue to teach children to determine the shape of parts by similarity to standards. Display the image of an object through its characteristic shape, size of the main parts and details.
Technical tasks: improve the ability to draw objects consisting of round shapes; convey round and oval-shaped objects in the drawing, correctly position the parts on the sheet. Practice form-building movements. When painting near the outline, use short, abrupt strokes.
Preliminary work: look at the picture of a chicken and a duckling (films, slides, illustrations)
.
Learn the game “Meadow Duck”
. All the movements that are sung in the song are shown and sung by the children together with the teacher:
Children: Meadow duck
Where did you spend the night?
I'll take my children!
Children show movements:
- walk, waddling from one foot to the other
A chicken and a duckling are walking on the grass , a sparrow flies up, says hello, and asks the children what birds are walking on the grass. Chick ? Duckling? But are they the same? How do you differentiate them?
Examination (toy or picture)
.
This work can be done outside of class , on a walk, in free activity or during classes to familiarize yourself with the outside world. Guys, let's look at the chicken and the duckling and explain to the sparrow how they differ and how they are similar. a chicken have ? Body, legs, head, wings, tail, beak. What does the duckling have? Body, head... same as a chicken ... let's look at the body and compare. Are they the same shape? No, the duckling’s is oval, and the chicken’s is round . What color? Both are yellow. What about size? Look at the paws. a chicken doesn't ? Webbed! Why are they needed? To make swimming easier! Why doesn't the chicken ? He doesn't swim. Now look at the tail. How are ponytails different? Who has the wider one? What can you say about the wings? They are the same, rounded. What else needs to be considered? Beak! Identical beaks? No! What is the difference? The duckling is wider! Why do you think? What does he eat, remember? Weed! Which beak is easier to pluck grass with? Does the chicken have a different beak ? Which? Spicy! What does the chicken eat ? That's right, he eats grains! These are the wonderful chickens and ducklings draw with you today . Maybe some of you would like to give your drawing to the sparrow so that he can better remember the difference between a duckling and a chicken ?
Showing the drawing (together with the child)
: Together with the child,
draw the duckling’s body and tail. Draw the paws and beak . When the paint dries, draw an eye . With another child, draw the body and tail of a chicken , then the legs and beak.
The display is accompanied by comments, a reminder of the similarities and differences. Main part. Independent drawing . I use the following techniques: I remind you of the sequence of work, I clarify how to draw a circle and an oval (showing with a brush in the air, I advise how to arrange the elements on the sheet. Using questions, I clarify the methods of action. Individually I check with each child whether he is using it correctly with a brush. I individually evaluate, monitor and provide assistance. If necessary, I show the elements of the image on my piece of paper and give individual advice (quietly)
.
Some advice and recommendations can be given on behalf of the guest (sparrow)
.
I analyze the works near the exhibition where the children placed their works. Sparrow carefully examines the work. I give an overall positive assessment. Then I mark the most expressive works (in terms of quality, compliance with requirements, accuracy)
.
What a wonderful chicken Arina turned out to be : feather to feather, he will probably be friends with Dima’s duckling, because he is just as neat. What do you think, which chicken just ate a lot of worms? That's how well-fed Masha's chicken ! Who has a shaggy chicken with feathers in different directions? At Zhenya's. Maybe he got into a fight with someone? To make the feathers even, how should you apply the brush? Along the pile, be careful and take more paint, then the feathers will be “smoothed”
.
I celebrate works that demonstrate creativity. Someone who dreamed up and added something special to the work. Well done, Kolya! You drew a lot of grains for the chicken ! Vanya, what else have you drawn ? For the duckling - grass, and for the chicken - a worm !
chickens together with the sparrow (round dance, dancing, introduce a literary word)
.
Offer to play the outdoor game “Sparrows and the Car”
.
Farewell to the guest. Give the sparrow a drawing depicting a chicken and a duckling (an illustration or a pre-prepared version)
Summary of the drawing lesson “Hen and Chicks” Non-traditional drawing “Hen and Chicks”. Goal: to teach children to draw a hen with chicks with their fingers, finishing all the details with brushes. Summary of the lesson on designing “Naughty Ducklings” (LEGO Construction Set) in the senior group Summary of the lesson on designing “Naughty Ducklings” (LEGO Construction Set) in the senior compensatory group, for Poultry Day at MAAM. Author:. Summary of the modeling lesson “Mother Duck and Ducklings” (first junior group) Purpose: To arouse in children the desire to depict, sculpt; Develop fine motor skills and creative abilities; Continue to master some. Summary of the lesson on drawing “Butterflies” in the middle group Hello dear colleagues! I bring to your attention a summary of a lesson in the middle group on unconventional drawing: klyasography, etc. Summary of the drawing lesson “Bullfinch” in the middle group Topic: “Bullfinch” Educational areas: cognitive, artistic-aesthetic, speech. Objectives: introduce the name of birds, their.
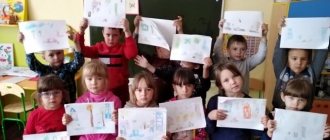
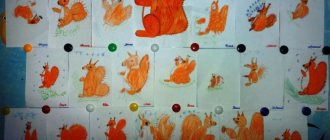
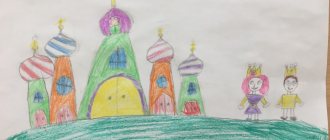
Photo gallery: examples of children's work on the topic “Birds”
The image of the Firebird is conveyed very elegantly - with a combination of yellow and orange colors
The poking method allows you to convey the fluffiness of a swan
The background is very beautifully designed - the sky
The multi-colored image of the cockerel echoes the variegated flowers with petals of the same tones
Bright colors combined with unconventional techniques give an original result
The plot composition has many characters
Pencil produces soft pastel colors
Subject compositions are often easier to depict with pencils
The black and yellow titmouse looks beautiful against the background of blue snow
The fairytale bird looks more like a small chick hiding in a pine branch
You can unusually convey the loose tail of almost any bird with your palm
Future schoolchildren learn to draw sitting birds
The image of an owl encourages the use of unconventional techniques
Using foam rubber, the shaggy plumage of an owl is well conveyed
The owl's plumage is originally rendered in the form of brown zigzags on a yellow background.
The images of sparrows pecking grains are conveyed very realistically
Beautiful subject composition, gives the impression of birds moving
Children usually love to portray living creatures, especially those that they can observe in nature. That's why the theme "Birds" is always popular with preschoolers. Many pupils of the preparatory group are able to accurately notice the characteristic features of different birds and convey them through drawing, harmoniously building a composition. The main thing for the teacher is to captivate the students, motivate them to be creative, and provide some interesting information that will additionally awaken interest in birds.
On the topic: methodological developments, presentations and notes
Summary of direct educational activities on drawing in the middle group on the topic “Hedgehog”.
Program tasks: Consolidation of modeling techniques mastered in previous groups. Formation of the ability to smooth the surface of a sculpted object with your fingers. Getting to know how to use it.
Summary of directly organized educational activities on design in the middle group.
Summary of organized educational activities on drawing “Sheep” (middle group).
Objectives: 1. To contribute to the revitalization of summer experiences.2. Strengthen the ability to reflect your impressions in a drawing3. consolidate knowledge of the rules of working with paints. Equipment. Doll. Summer photos, toniro.
Goal: to develop the creative abilities of children. Objectives: - to strengthen children’s ability to draw rectangular objects; - to create the simplest rhythm of images; - to exercise the ability to accurately draw.
Mastering a new method of drawing - printing with a foam sponge, which allows you to most clearly and colorfully show the characteristic texture of the depicted object. Develop creative abilities.
Source
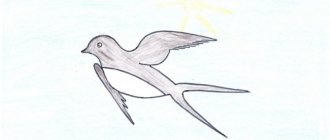
How to draw a sparrow
Want to learn how to draw a bird with a pencil? Another simple option is the sparrow.
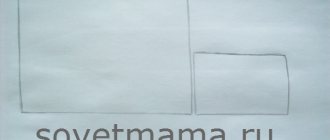
To begin, draw the outlines of the torso in the shape of an oval, head (circle) and tail (triangle).
A triangle line needs to be drawn for the tail, followed by the contours of the legs. For the front part, draw a circle (the head), then the body and tail.
The dividing line will be needed for the wing.
Now let's move on to the paws. Once they are drawn, return to the head. Start with the eye, then draw the beak, and for coloring, start with the markings.
We recommend reading:
How to draw a fox with a pencil? Detailed instructions with photos and descriptions. Step-by-step lesson for children + master class- How to draw a girl - make a portrait and general drawing correctly and beautifully (150 photos and videos)
How to draw a child - stages of creating drawings and recommendations for their design (video + 125 photos)
The next step is to feather the sparrow and give the drawing a realistic look (there are many pictures and videos on the Internet showing how easy it is to draw a bird).
How to draw an owl
Since ancient times, the owl was considered the wisest bird in the world. Its plumage attracted the attention of both professional artists and amateurs. You can draw an owl in a few steps. You will need a pencil, a sketchbook and some markers.
The sheet should be in a vertical position. Start with two large circles, because... The owl's eyes are big. There should also be smaller circles inside them.
Then draw a triangular beak and draw a line from both sides of it.
Now move to the crown. From the lines drawn from the beak, draw the ears and connect them in the center with an arc.
The next item is the wings. It is necessary to draw a line from the bottom of the eyes, rounding it at the bottom. Repeat the same on the other side.
From the wings you need to draw a line for the future body. It needs to be narrowed downwards. Draw arcs in the center of the abdomen, round them at the bottom and connect them to the outer lines. The line below is necessary to connect the torso.
All that remains is to draw the paws. There are 3 small ovals per paw. Everything is ready, all that remains is to outline with a felt-tip pen and color the drawing.
How to draw a parrot
Who doesn't love budgies and other parrots? That is why step-by-step instructions for beginners were made.
Let's start with 2 ovals: a small upper one and a large lower one. The first will serve as the basis for the head, the second - for the body.
From the future body, 3 long stripes and 1 short stripe are drawn - a kind of “base” for the tail.
Next, teardrop-shaped wings are drawn: one on top of the large oval, the other on the other side. Then it comes to the beak, which should be crooked.
Now we move on to the contours of the parrot, bringing the head and body to mind.
To give the parrot something to sit on, you need to draw a wavy branch. The parrot's legs are drawn in the form of long ovals. And don't forget about the claws!
To give the branch a beautiful look, draw leaves on it, preferably of different shapes.
Next, you have to decide where to draw the parrot’s future eye. Draw a circle there, and inside it there are already several circles. The last one should show highlights.
At the very bottom of the belly, draw ovals with sharp ends - they act here as the feathers of the future tail.
The last stage is coloring. Use bright colors for it. The body should be painted red, the beak should be yellow, and the wings should be orange. Also color a few feathers orange, and the rest blue.
Of course, the branch should be brown, the leaves should be green, and the pupil should be black.
All that remains is to outline the drawing with a black felt-tip pen.
How to draw a duck
First, draw an oval head, and inside a circle as an eye, on it there are two sticks as eyelashes.
For the beak you will need 2 oval-like figures with tapered ends (one should be smaller than the other).
Move on to the torso. It can be round under the head, but you need to bring out the tip from behind - the future tail of the duck.
Draw a wing in the center of the body, and inside the eye - a pupil and a couple of circles for highlights.
You can paint the duck yellow (the wing should be lighter), the pupil black, and the beak orange.
How to draw a rooster
The Cockerel is a character in many Russian folk tales. In addition, since ancient times it was considered the guardian of the hearth and symbolized the morning dawn. Surely you are interested in learning how to draw a rooster? To do this you will need checkered paper and a set of pencils.
Start with the head and torso. Draw a circle without finishing its lines. Bring the body out from below through arcs and connect them into a corner for the future tail.
Move to the beak, which can be represented by two triangles, then to the scallop and to the eye.
Next, the wing is drawn onto the body, rounded figures are drawn from below, and the legs are drawn from them.
Of course, a cockerel needs a beautiful, large and colorful tail. There are 2 arcs for 1 feather. You will need 4 of these feathers.
All that remains is to trace the cockerel with a pen and color it. Bright colors are required for the tail and legs, paint the comb red and the beak yellow. All.
How to draw a flamingo
Artists and poets loved to paint these beautiful and bright birds in paintings and sing them in poems. Here you can see a simple and clear way to depict a flamingo especially for you.
2 lines are drawn: straight at the bottom, wavy at the top. On the right side, a tail is drawn using small ovals. Draw a wing in the center of the belly.
The neck should be curved and long. 2 identical wavy lines are drawn on both sides, then an eye and a beak with a bent end are drawn.
At the bottom of the abdomen you need to draw two legs: one straight, the other bent into a triangular shape. Fingers are added to the bent foot, because The flamingo stands with one foot in the water. Therefore, you need to draw arcs.
The last step is coloring. The bird will be pink-purple in color, and its beak and legs will be yellow.