Creating a paper applique is a fairly popular task in kindergarten. Often, a task is given to parents so that they can implement it together with their child. One of the popular themes is the theme of birds.
- What paper is suitable for appliques?
- Application options for children
- Junior group
- Middle group
- Senior group
- Ready-made templates
- Origami parrot: how to fold it from paper
- Pigeon
- Crow
- Step-by-step instruction
- Cutting
- Glue
- Tips and tricks
- Gallery of ready-made examples of making birds – 14 photos
Very often, such crafts are proposed to be done in the spring, when nature begins to bloom.
Making a bird out of paper is not that difficult. However, despite this, you can vary the degree of difficulty depending on which group the child is in. Using ready-made templates, you can make an interesting and original craft about birds, which will not only decorate the interior of your home, but will also surprise your kindergarten teacher.
First option
You will need:
- base sheet
- brushes and watercolor
- cotton pads
- glue
- plasticine
Sequencing:
- Prepare the main working material. Paint with gouache and mark the barnyard where the chicks supposedly walk. You can just take colored cardboard.
- Dye cotton pads yellow. Cut them in half or trim rounds to give the body the desired shape.
- Glue the blanks on the base plane.
- Complete your creation with plasticine parts. You can create a beak, eyes and paws from this material or complement the composition of the work with plant details.
We provide several variations of the design of compositions on this theme.
Firebird
The process of creating such a craft perfectly develops the imagination, because the character is magical and very bright.
- To make the head and body, cut out a ten-centimeter square piece from colored paper.
- Form a square into a triangle and bend along the larger side.
- Now expand the square - it is divided into four sectors.
- To get the body of the bird, glue both edges overlapping.
- The belly is the larger side, and the smaller side is the back.
- To create a chic ponytail, cut nine nine-centimeter strips - curl them or leave them straight.
- Glue three stripes to the back, six will serve as material for making wings also on the back.
- You can also make both the tail and wings using the palm technique.
- You can cut out eyes and other small details from colored paper or draw them.
- Attach the bird to the background on a branch of colored paper, decorate the background by painting it and gluing parts from colored paper.
Second way
A simplified way to create chickens or geese will be possible even for the smallest.
Sequencing:
- Draw or print a picture of a bird.
- Paint the comb, paws, eyes, etc.
- Take regular cotton wool and tear it into small pieces.
- Using craft glue, attach the white lumps in the places where the feathers should be.
Tips and tricks
As tips in the recommendations, we can remind you that children need to be instructed on the use of scissors and glue, if this has not been done previously by parents or one of the adults. It is also worth remembering that even with the help of paper, a child can get hurt if he accidentally runs the edge of the paper across the skin. It is for this reason that parents must monitor every action of the child so that in the future he does not cause any injury to himself.
Any of the instructions can be applied to any type of bird; in this step everything depends only on the imagination of the parents and the child.
If you follow all the rules described above and do everything in accordance with the instructions, then the end result will be wonderful bird-themed crafts.
You can be 100% sure that such crafts will surprise others and allow the child to show all his capabilities. At the stage of creating crafts, you can invite the child to fantasize on a given topic, or discuss with him on the topic of finalizing the figures. The child will certainly be interested in the process of creating such birds.
Gallery of ready-made examples of making birds – 14 photos
You can make the bird colorful by decorating it in your favorite shade.Third option
A more complex method for older children.
Sequencing:
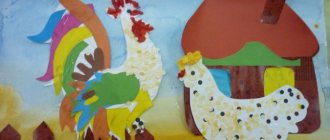
Create an original background on a landscape sheet that will match the theme of the work. In extreme cases, the sky and grass will suffice.
Mark with a pencil where the rest of the elements will be located. Cut out parts of the house from colored sheets and glue them to the base, which should already be dry.
Download a black and white drawing of a chicken and a rooster from the Internet. If you know how, you can draw it by hand on a white sheet. Cut out the silhouette.
Prepare colored elements that will correspond to the sizes and shapes of body parts: wings, comb, body, tail feathers, etc.
Glue the blanks and decorate the top with colored paper pieces.
All this work can be done collectively, entrusting the child with the responsible work of gluing the parts in the right places.
Firebird
A fairy-tale character who looks as fantasy suggests. An ideal composition for beginners.
Step-by-step instruction
All step-by-step instructions related to crafts are presented above. In this case, you cannot skip any of the steps, since omission may affect the final result. This condition is especially important when creating crafts using the origami technique. It is when creating a model using the origami technique that absolutely every step is important, otherwise the parent and child risk being left without that same figurine.
Cutting
At the stage of cutting out templates for crafts, you need to do this carefully. In order for the models and details to be fully repeated, the creation of the template can be entrusted to parents, or it is necessary that children carry out this step under strict adult supervision.
Glue
Gluing all the parts must also be done carefully. The most practical option would be a convenient glue stick rather than PVA glue, as it is convenient and safe to use among children.
The second method is mosaic
- Choose different colors, but similar tones. For example, different shades of red or orange.
- Cut into pieces close to square, rectangular, triangular shapes, but of different sizes.
- Glue them onto plain cardboard to create the desired image.
This is what a craft made using this method looks like.
Wild birds
This is a method of embodying the lifestyle of untamed winged creatures, as children see them. Most often, such compositions depict keys flying to the south, as well as caring mothers in a nest with babies or in search of food among the foliage of a tree.
A three-dimensional image will be able to convey all the beauty as much as possible.
Sequencing:
- The base must be solid. You can simply take a plain sheet of cardboard or paint it, adding elements that correspond to the character of the product (leaves, flowers, clouds, etc.)
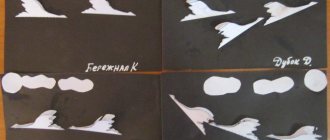
- Fold white A4 in half and along the fold draw the shape of a bird from the side - head, elongated neck, raised wing, tail.
- Cut along the outline and glue on one side only.
- Create several of these birds, preferably of different sizes, so that they are not identical.
- After the glue has dried, “straighten the feathers” of the jamb - slightly twist the part of the wing that is not glued to the outside so that it puffs up. A few cuts symbolizing plumage will also not hurt.
In winter, it will be relevant to implement the idea of winged animals that do not fly to warmer climes. The birds at the feeder will remind you of caring for our little brothers. Bullfinches and tits can be easily recognized by the bright colors of their plumage, and your plans can be realized with the help of decorated cotton pads.
Ready-made templates
You can find a huge number of bird templates on the Internet. Here are examples of ready-made templates that can be used for paper crafts:
Origami parrot: how to fold it from paper
An interesting bird-themed craft will be a parrot using the simple origami technique, which is popular among children. This craft is suitable for any age and it is not complicated. All actions must be implemented in accordance with the diagram presented below.
You should choose paper that is not too thick, preferably one-sided.
In total, the scheme contains 12 steps, all of them are simple and understandable.
1. The basis for the parrot will be a square, which must be folded in half diagonally.
2. The far edges are folded towards the center of the sheet as shown in the diagram.
3. The free corner is bent.
4-11. After which all the parts are folded and turned out as shown in the diagram.
12. The end result is an interesting two-color parrot. In order to make the parrot more bird-like, you should glue a homemade eye. It’s even better to do it on both sides. To create an eye you will need white and black paper. Circles are cut out of paper. The black circle will be 2 times smaller than the white one. Next, the circles are glued to the place of the eyes.
The origami parrot is ready! This craft will look most advantageous in the junior and middle groups of kindergarten.
Pigeon
If you want to make a dove, then this is also quite possible. Such a craft will not require large-scale expenses, and ready-made crafts can be used as decorations.
This dove is made in 5 minutes; for this you will need: white paper, scissors, cardboard, glue stick and napkins. A silhouette of a dove of the required size is drawn on cardboard, then the template is cut out.
The resulting template is applied to the cardboard and the required number of birds is created.
Next, take napkins and fold them like an accordion.
Having connected the templates, we make cuts into which the wings will be inserted (for example, from napkins).
The accordion is threaded through the slit and the wings are straightened.
This craft is no different from the first craft presented in the list. However, in this case the craft is considered as a specific pigeon.
Crow
To make a paper crow using the origami technique you will need a few materials. Making an origami crow is quite simple. A special advantage of this model is that a notebook sheet can be used as a basis. It is precisely for this reason that crows are quite popular among schoolchildren, but this does not mean at all that such crafts are made exclusively by schoolchildren.
As mentioned earlier, a sheet of paper with a proportion of 4 to 5 is taken as a basis. It is best to choose paper of a suitable color, not too thick so that it is easy to bend.
It is noteworthy that if you take thicker paper, the output will be a crow, which can not only open and close its mouth, but also click quite loudly.
This origami must be assembled in accordance with the diagram presented below.
The sheet that acts as the main one must be folded in half, and then in half again.
Next, the edges are bent as shown in the diagram and the workpiece is partially unfolded. After which the part is reattached, as shown in the sixth step. In the same step, a small incision is made.
The two halves of the opposite ends are connected and at the end we get the head of a crow.
In order for the part to look more like a crow, you need to glue its eyes. Eyes can be made from plain white and black paper.
other methods
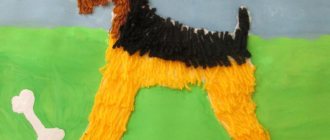
Tear-off - the picture is assembled from small multi-colored pieces. This technique trains perseverance because it takes much longer than the others. Additionally, fine motor skills are developed, since working with small elements is very painstaking.
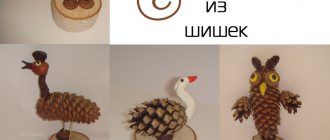
Volumetric - the nest is often depicted on a paper plate or papier-mâché craft. The materials from which the product will be made can be very diverse: cotton wool, feathers, threads, dry grass, felt, paper, etc. It all depends on the child’s capabilities and imagination.
The combinations are countless. The miraculous embodiment is practiced not only in kindergartens, but also by art history professionals.
Crafts made from dry leaves
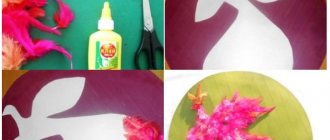
To create a firebird from dry leaves, prepare dry leaves, a glue gun, paint, and a sheet of cardboard.
- For the background, paint cardboard or use colored cardboard.
- Spread the paper and carefully arrange the leaves, and then color them.
- Now dry the leaves. Apply hot glue to the cardboard and glue colorful leaves.
- To do this, there must be an adhesive layer on the cardboard sheet, as well as spot-applied glue on the leaves.
- First, form the shape of a tail, then a larger leaf that stands out in shade - this will be the body of the firebird.
- Paws and eyes can be made from colored paper or cardboard.
- The magic bird is ready!


