Option 1: balloon kitten
Perhaps the easiest way to make a cat out of plasticine with your own hands in a matter of minutes is to sculpt it from a ball.
First of all, cut a piece of plasticine the size of 2/3 of a block and knead it in your palms.
When the material becomes soft and pliable, form it into a ball. It will serve as the basis for making the body of the figurine. Form 4 identical processes from the workpiece by stretching - 4 paws, as well as 2 processes from opposite parts of the ball - head and tail.
Consistently work on each detail of the figure until it acquires the desired shape. The appendage for the head should be slightly larger than the rest. It ends with two triangular ears.
Make the front legs slightly bent and the hind legs straight. Pull the tail out slightly and curl it with a crochet hook. To decorate the animal’s face, form 2 small balls from white plasticine. When determining the size of the eyes, keep in mind that too small ones will not give the desired expressiveness, and too large ones will give the plasticine kitten an upset or even surprised look.
Slightly flatten the formed balls of the same size and add them with pupils made from sausages of black plasticine. To carefully “plant” the eyes, use the plastic stack that comes with the kit. To make your look more expressive, form thin films of the upper eyelids.
At the final stage, all that remains is to correct the shape of the ears, correct the curl of the tail and make the paws more stable.
Option 2: cat with a curved back
This option is more complicated, since it involves first making individual elements and only then assembling the figure.
Divide the block of plasticine into 3 unequal parts: body, head and tail. Form an oval from a large piece. Give it a flattened and slightly curved shape. To make the animal's paws, split the ends of the block in half. The total length of the cuts should not exceed 1/3 of the bar.
Form paws from the separated elements. Roll a ball from a pre-cut piece and use it to form a slightly flattened muzzle with erect ears. Ears are easy to make using “tucks” on both sides of the crown.
From the last third piece, form a sausage, which will serve as the basis for making the tail.
At the final stage, all that remains is to design the muzzle. You can limit yourself to the standard version, or create a more charismatic face.
To obtain a contrasting combination when forming the cheeks and eyes of the animal, use white plasticine. It is better to make the pupils from a thin strip of black or green plasticine. It is convenient to make antennae and eyelashes by pressing the side surface of a toothpick.
If desired, the paws can be supplemented with “drawing” of fingers with claws. This is easy to do with the same toothpick.
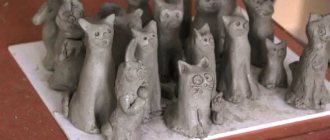
Step-by-step instructions with photos on how to make a sitting cat from plasticine
A cute sitting cat that will be interesting to sculpt for children in the older group or even younger.
How to make a plasticine cat for children with your own hands step by step:
- Roll and flatten the ball a little - the head and shape the muzzle.
- Make two triangles - ears.
- Add wire whiskers.
- Form a large cone for the body.
- Roll two balls for the front paws and two drops for the back paws.
- Assemble the body and draw the legs and claws.
The animal's paws are outlined with three rather than two lines.
Video master classes on how to sculpt a sitting cat
On the topic: methodological developments, presentations and notes
State budgetary preschool educational institution kindergarten No. 81 of a general developmental type with priority implementation of activities for the cognitive and speech development of children in Vyborg paradise.
Improve your ability to sculpt a cat using a combined method.
notes on the productive activity of modeling.
Summary of a modeling lesson in the middle group.
The purpose of the GCD: To identify children’s skills in sculpting a four-legged animal - a cat. Program content: Educational: To identify children’s skills in using sculpting techniques: rolling up plastic.
Notes on modeling for the middle group.
Goal: to teach how to sculpt an image of a house in bas-relief. Objectives: Educational: To consolidate the ability to sculpt columns from plasticine and make a house out of them; To form generalized ideas about the house.
Source
Option 3: Puss in Boots
Children love listening to fairy tales and imagining what fictional characters really look like. So why not make one of these? Take the same puss in boots. We are sure that many children will like the idea of creating a resourceful and sociable hero.
Having chosen the plasticine of the desired color, form 2 balls with a diameter of 2.5 cm. Separately roll a sausage 2 cm thick and 4 cm long. To make the paws, make 4 sausage-shaped blanks 1 cm thick and 1.5 cm long. The smallest ball is the basis for the future ear. You will also need one piece 0.5 cm thick and 5 cm long to make the tail.
To make a hat, use plasticine in a contrasting shade. Form it into a flat cake with a diameter of 4 cm. Separately, mold the top of the hat in the form of a flattened cylinder. Connect both pieces.
To decorate the headdress with a feather, form an oval cake from white plasticine. Use a toothpick or stack to make scored fringed edges. Add one end of the feather with a black thin roller-leg.
Let's start sculpting the face. To do this, attach a flattened triangle-shaped ear to the ball-head. Make the cheeks from 2 white cakes of equal size. Eyes - by combining white drop-shaped blanks and green flattened balls of the same diameter. The last to be sculpted is the black nose and mustache.
Put a headdress on the finished muzzle and attach a white feather.
To sculpt the figurine’s legs, shod in unusual, memorable boots, take red plasticine. Make 2 pieces of it, 3.5 cm long, that look like pepper pods. Make flat elongated cakes from brown plasticine - soles. To fashion heels, roll up the back edges of the sole.
Connect the boots with blanks for the hind legs. To make the joint more invisible, use flat strips 1 cm wide to form the cuffs of the bootlegs.
A large contrasting cloak will help complement the image of a fairy-tale character. To make it, make a thin trapezoidal cake from plasticine with a base width of 10-12 cm, in the upper part 5-6 cm with a product height of 5 cm.
Make a body from the largest sausage. Attach the lower and upper legs to it. To make the figure more stable, use toothpicks when joining the body with the lower limbs.
All that remains is to put the cloak on the figure, pressing it tightly to the back and back of the limbs. At the final stage, attach the head and attach the tail. To add dynamism to the figure, lift one of the upper legs up as a sign of greeting.
Basics of working with plasticine: how to get started
Before making a cat out of plasticine, you should prepare the material of the desired color; if such a block is not in the box, you can mix several different pieces.
The most convenient way to start sculpting any parts is by rolling balls, which are subsequently given the desired shape. To draw fingers or fur on a plasticine craft, it is better to prepare toothpicks in advance - the stack may be too thick for neat lines (it is also convenient to attach the figure’s head to them so that it holds more securely). Antennae can be easily made from pieces of wire or pine needles, and beads can be installed instead of eyes.
If you mix pieces of different colors (for example, orange, black and white), not completely, you will get the original three-color color of the animal.