Simple drawing
To draw a simple drawing with your child, you need to follow several steps:
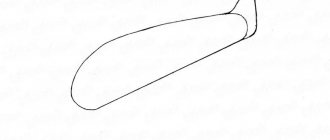
- Draw an egg with a blunt base.
- Draw a narrow stand on the base.
- At the top of the resulting oval, draw a circle for the face and bangs.
- Draw a face: eyes, nose, cheeks, smile and hair.
- Draw arms on both sides of the body.
To put on a matryoshka doll, you need:
- Draw 2 smooth lines under the circle of the face from the center to the sides. You will get a scarf.
- Draw the knot and ends of the scarf.
- At the bottom of the figure, draw the hem of the sundress.
- Draw any pattern on the apron: flower, berries, circles, and so on.
The main stages of depicting a matryoshka doll
According to Russian tradition, wooden toys that are nested inside one another have always been painted. The souvenir has many styles. The name of the painting is associated with the area where it was made. For example, Zagorskaya, Kirovskaya, Semenovskaya, Turinskaya and so on.
Using these instructions, you can learn how to draw a wooden toy either on paper or another base (egg, stone, etc.):
| Part of work | Execution Description |
| Head | Draw a small circle. To obtain smooth edges of a geometric figure, you can use a compass or a round object of various diameters - saucers, lids, cups and others. |
| Torso | Below, draw a second circle, but larger. Both circles should touch each other. |
| Form | To get the traditional shape of a wooden toy, the circles need to be connected with smooth lines, and the excess parts should be removed with an eraser. |
| Face | Draw a face inside the first circle, which is also shaped like a circle. On the face draw eyes, nose, mouth, eyebrows, and round cheeks. In the upper part of the face, draw hair covering the forehead. |
| Handkerchief | At the bottom of the face circle, draw a knot in the scarf. Separate the scarf from the body with wavy lines. |
| Toy decoration | At the bottom of the figure, draw a base on which the toy stands. In the center of the body, divide the upper part of the figure from the lower half with a semicircular line. Erase unnecessary lines and make the contours brighter. |
| Apron | Decorate the lower part of the toy with colorful patterns consisting of flowers and decorative lines. |
| Coloring | Give your face a light beige tint, make your cheeks red, and your hair light brown. The base of the toy should be brown, and the patterns should be bright. |
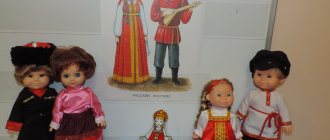
Before the children start drawing, you can show them a visual material with a picture of a nesting doll, and also lay out the manual on the tables.
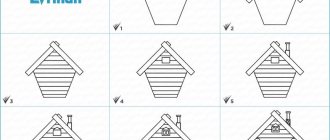
Then perform the following steps step by step with a pencil:
- The first step is to draw a circle, which will be the top part of the nesting doll.
- Draw a lower oval and connect it to the head.
- In the central part of the upper circle draw a round face and hair.
- Draw eyes, lips and eyebrows on the face.
- Under the circle that represents the face, add a bow and an apron.
The matryoshka doll (the drawing for children must match the description) can be brought to life. To do this, you need to color her sundress and scarf. Young artists can find their favorite rich colors. The sundress can be decorated with floral patterns or bright berries. Or you can invite children to color a ready-made black and white image of a nesting doll.
On the topic: methodological developments, presentations and notes
Summary of a lesson on familiarizing children with their surroundings. Topic: “Toys. Getting to know the Russian nesting doll" - from a series of integrated lessons on the topic: "Matryoshka".
The activity will help introduce children to the folk toy - matryoshka. Integration of educational areas: "Cognition", "Artistic creativity", "Communication", "Music".
Long term project. For preschool teachers.
Application for the middle group of kindergarten, from the “Our Motherland” section.
Program content: Educational objectives: Tell about the most popular folk wooden toy, nesting dolls. Teach children to distinguish between different techniques for painting nesting dolls. Develop children's creative imagination.
Introduction to Russian folk culture should be introduced from early childhood.
Source
Simple drawing with felt-tip pens
A matryoshka doll (a drawing for children does not have to be completely filled in with a felt-tip pen) can be drawn with dashes of different lengths, dots, and squiggles.
The result will be a more accurate picture.
- Use a black felt-tip pen to draw a circle as evenly as possible.
- Below, on the outside of the circle, draw a knot and a bow.
- Draw hair inside the circle: 2 arcs, starting from one top point and ending on different sides of the circle.
- Draw 2 eyes in the central part of the head, and a smile just below.
Draw a big eight like this:
- Draw a semicircle above your head, 1 cm from it.
- Draw a second arc at the bottom of the sheet. Its size must be larger than the first arc.
- Connect the left edge of the upper arc with the left edge of the lower arc with a line curved inward.
- Connect the right edge of the upper arc with the right edge of the lower arc with a line curved inward.
This will create a toy figure.
Further:
- Draw smooth lines that form the edge of the scarf.
- Draw an apron, the upper part of which rests on the scarf.
- Draw hands on the sides of the matryoshka (between the apron and the edge of the toy). The sleeve line begins where the scarf ends and is formed from a small rectangle.
- Draw a flower in the center of the apron.
To color the sketch, you need to take felt-tip pens in the following shades: yellow, orange, beige, light and dark brown, green and red:
- Use a yellow marker to color the apron.
- Use an orange felt-tip pen to color the lower part of the nesting doll (dress).
- In order to paint your face, you need to choose a shade of flesh color.
- Use a light brown felt-tip pen to color your hair. Then take a dark brown felt-tip pen and draw several stripes through your hair to create shimmer.
- Color the scarf green.
- Color the flower on the apron red.
- Put red dots on the dress.
- Draw a spiral pattern on the apron in orange, bordering the apron in a circle.
- Color your hands with a flesh-colored felt-tip pen.
GCD for drawing in the preparatory group “Merry dolls”
Marina Shekel
GCD for drawing in the preparatory group “Merry dolls”
Program content: continue to introduce children to the nesting doll as a type of folk toy (history of creation, features of appearance and decor, source material, the most famous crafts - Semyonovskaya, Polkhov-Maidanskaya, develop the ability to draw a nesting doll from life , as accurately as possible conveying the shape, proportions and design elements, develop an eye, a sense of color, shape, rhythm, proportion, cultivate interest in folk culture, aesthetic taste.