The joint creativity of a child with his parents contributes to the formation of trusting relationships, familiarizing the child with the world around him, traditions, rituals and holidays.
On the eve of festive events, an adult can invite the child to make children's crafts for the city day “My Favorite City”.
The variety of materials used will help develop the child's fine motor skills and tactile perception. A craft on the theme “My City” can be created from plasticine, colored paper, or corrugated cardboard.
DIY “Cardboard City” craft
To create a themed gift for loved ones, you can make “City” paper and cardboard crafts. To create such a city, the following tools are needed:
- glue;
- scissors;
- thick cardboard;
- thick marker;
- a simple pencil;
- acrylic paints;
- brush;
- glass of water.
- You need to take thick cardboard and cut out the silhouette of a building from it. Thus, it is necessary to create several houses.
- Draw the resulting template in the middle with a simple pencil.
- Draw a small line with a pencil next to the main one to the middle of the house. Cut out the resulting strip of cardboard.
- On some houses it is necessary to cut out the middle from the top or bottom of the house, since in the future the two parts will be connected to each other.
- We connect the two halves of the house.
- We draw out the location of windows and doors on the house with a simple pencil.
- We paint both parts of the house with acrylic paints.
- Let's connect them together.
- In a similar way, we produce several houses of varying thickness, height, and width.
- We take a sheet of Whatman paper and draw the markings of the lawn and paths with a simple pencil.
- We paint whatman paper with acrylic paints.
- We place the resulting houses on a sheet of Whatman paper.
You and your child can make paper crafts and create a city in the same way: first we draw and paint the houses with paints, then we cut out and glue the bottom part of the houses to a sheet of white paper.
Thus, in the process of creative activity, the child will develop the importance and significance of such a festive event as City Day.
Source: https://womanadvice.ru/podelki-na-temu-moy-gorod
How to make a house in the form of an applique
House appliqué is a standard technique of gluing pieces of paper cut out in a specific shape onto a sheet or cardboard. If we talk about forms, they are selected in accordance with the selected type of building. So, there are separate templates for a Russian hut or apartment building. We must not forget about the non-standard forms of famous buildings, for example, skyscrapers or a high-rise building on Kotelnicheskaya Embankment in Moscow.
Detailed information here
Required materials and tools
The hut applique is assembled in accordance with one’s own visions or on the instructions of an educator or teacher. To work, your child will need:
- colored and plain white office paper;
- cardboard: white, colored;
- scissors, a stationery knife if necessary;
- glue: PVA or pencil;
- paints, brushes, pen, pencil, ruler and other items that may be needed in your work.
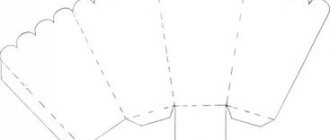
Sometimes ready-made cutting templates are used, which must first be printed.
Children should not attempt to print and work with scissors or a utility knife on their own if they have not done so before. Preschoolers should always have parents with them to supervise the process.
Step-by-step assembly with photos
For step-by-step assembly, we will consider one applique of a house made of colored paper made using standard techniques. In this option, it is proposed to make several houses in a clearing at once and add flowers to the composition.
The step-by-step assembly is as follows:
- First you need to prepare the materials and tools for work. The younger group or the second youngest group (children 4-5 years old) can use pre-cut blanks. The teacher will make the blanks, so the children will not have to work with scissors.
- Next, you need to take a blue sheet of paper and stick a green clearing on top of it. The clearing is represented as a semicircular figure, which will look like a hill.
- Then cut out the parts of the houses. To do this, you can use a special house stencil for cutting. But for the craft in question, it is enough to cut squares of brown paper, triangles of different colors and yellow rectangles.
- Cut out blanks for daisies from white and yellow paper.
- Now you need to assemble fairy houses by gluing them onto a green clearing. Also glue the flowers: first a white blank, then a yellow circle is attached to it. In addition, you can cut a track.
The pictures for the application can be changed if you use your imagination. You can use a lot of ready-made projects to come up with your own version of the craft.
Recommendations for design
The design of paper houses directly depends on the age of the child. Younger groups make simple compositions, where it is better to use ready-made hut templates. You can print them out or make them yourself for an adult.
Children from the preparatory group can complement their composition by decorating the adjacent area of the house. These could be trees, animals, flowers, a fence or household utensils, an imitation of a vegetable garden, etc. If it’s an apartment building, it means the whole city is gathered around. To do this, pre-cut people, cars and roads are glued on. As an example and to simplify the work, templates are offered for cutting out a house in a village and in a metropolis.
You can use window and door templates for a house or apartment building. Often, the formation of these additional elements occurs by cutting out parts with stationery knives. Older children can do this on their own, but under the close supervision of adults.
Video master class
We offer you a video master class on how to assemble a city yourself. The presented version considers a task for children using a large number of ready-made templates.
Simple instructions on how to make a house with kids
A paper house applique for kids should only be presented in the form of active use of templates. There is no need to burden your child with cutting out shapes if it is difficult for him to work with scissors. It is enough to offer him ready-made options for different bases, windows and doors, and try together with him to combine them in the right sequence. These can be colored houses, cut out individually from colored paper, or white buildings, pre-cut out of white paper according to a template.
Parents are also recommended to print out the finished compositions and try with their child to glue colored paper according to the pattern. You can print out a Russian hut, depicted with outlines, and glue colored shapes onto it. You can make the windows and door for such a house yourself. Children under 3 years old are allowed to use the window and door templates.
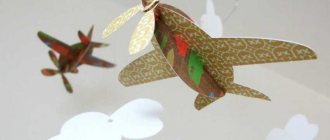
Origami schemes
Older children try to master complex techniques, which in the case of the house are represented by origami. Origami is a technique where work occurs only with the use of paper of various shapes, densities, and varieties. With a few simple movements you get a real craft.
Kids are offered several options for assembling a structure of varying degrees of complexity. Little builders will try to make several houses.
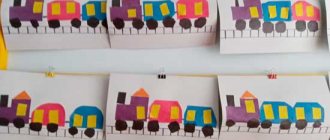
Applique city
The “City” applique made of colored paper will be a worthy decoration for any classroom and any room in the apartment. Even the smallest child can cope with its production,
if you help him overcome some difficulties.
Applique city
It is better to take cardboard in a light blue shade as the basis for the application. Against this background, the “City” application will look most organic. At the first stage of work, we glue a fairly wide black stripe to the bottom of this sheet (folded lengthwise).
In the center of this strip we glue a narrow (distributive) strip of white color. It turns out to be a road.
Road
Above it we glue an uneven strip of light green color. This will be the lawn. Cut out four rectangles from beige, light orange or brown paper. We make four square slits in each of them. The result is multi-storey houses, which we glue to the main background - on the “lawn”.
Lawn with houses
We cut out silhouettes of Christmas trees from green corrugated paper, and stems from brown paper. We glue Christmas trees between the houses.
Christmas trees
We cut out trapezoidal roofs for houses from pale yellow corrugated cardboard. Glue them. We cut out a traffic light from black paper and glue it next to the road. Opposite it, we lay out a pedestrian crossing with pieces of a white stripe.
Traffic light and pedestrian crossing
Cut out two cars from paper of different colors. We send them along the road in different directions.
Cars
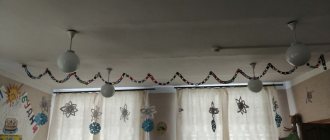
All that remains is to decorate our urban landscape: cut out flowers from colored paper and plant them on the lawn. We make small clouds from white paper, napkins or cotton pads and stick them on the sky.
Flowers and clouds
Between the clouds we place in the sky a bright, radiant sun cut out from a sheet of yellow paper.
Application favorite city
Our application on the theme “City” is ready! In front of us on the table lies a simple, but clearly recognizable landscape. If desired, you can make various variations of this picture - for example, evening and night views. To do this, you will only need to change the main background and the design of the sky.
Source: https://montessoriself.ru/applikatsiya-gorod/
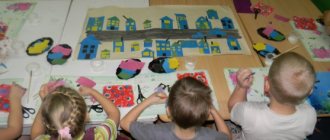
Group work on the application “My City” in the senior group
Kostyugova Natalya Vladimirovna
Group work on the application “My City” in the senior group
Collective work on application within the framework of the thematic week “My City” in the senior group
Goal: Continue to introduce children to their small homeland. To instill in children an interest in the environment, to develop observation skills (to transfer houses of different heights into applications, to cut a strip folded several times for the windows of a house. To teach children to cut out silhouettes of cars. To consolidate the ability to carefully use scissors and glue. To develop teamwork skills. To challenge pleasure and joy from creativity.
Tasks:
Expand children's ideas about their hometown.
To evoke in children a feeling of admiration for the beauty of their hometown.
Teach children to draw and cut out houses and trees.
Develop the ability to complement the image based on impressions of the surrounding life.
Cultivate a love for your hometown and a sense of pride in it, a desire to make it even more beautiful.
Equipment and materials: A4 sheet of Whatman paper, colored paper, colored cardboard, scissors, glue, napkins for each child.
Methods and techniques for working with children: demonstration, surprise moment, game situation, explanation, questions for children.
Progress of the lesson:
The teacher invites the children to look at the pictures of various streets of the city. (Using photographic material and illustrations).
for children:
— Guys, what do you see in these pictures? (Children's answers).
- What shape is the house? (Children's answers).
— The teacher discusses with the children what is drawn in these pictures and what color, size, etc.
In a big country, every person has his own small homeland; this is the town, village or hamlet where he was born. Our common, great Motherland consists of many small corners. What is the name of our country in which we live? (Children's answers).
Guys, yesterday we looked at slides about our city.
What did you like? Is our city beautiful?
Educator: There are many streets in our city. And each street has its own name. Tell me what street do you live on? (Children's answers)
Finger gymnastics “Home”.
I want to build a house (fold my hands like a house and raise them above my head)
So that there is a window in it, (join the fingers of both hands into a circle)
So that the house has a door, (we connect the palms of our hands together vertically)
Nearby for a pine tree to grow. (We raise one hand up and spread our fingers)
So that there is a fence around
The dog guarded the gate, (We join our hands in a lock and make a circle in front of us)
It was sunny, it was raining, (First, we raise our hands up, spread our fingers. Then we lower our fingers down, making “shaking” movements)
And the tulip bloomed in the garden! (Put your palms together and slowly open your fingers - “tulip bud”)
Didactic game “Bouquet of beautiful words”
Educator: Guys, let's collect a bouquet of beautiful words. Each of you says one beautiful word about our city and puts your flower in a vase. (Modern, cultural, sporty, cozy, beautiful, native, winter, green, big, small, kind, beloved, sweet, friendly, hospitable, etc.)
Here is a bouquet of beautiful words we have collected.
Physical education minute.
We get up early in the morning
We see the city outside the window.
He woke up, he lives.
He's calling us outside.
Let's all make a big poster of our city together, where we will place: houses, trees, cars.
During the lesson, the teacher reminds how to work with scissors and glue. Monitors the children’s work, compliance with the required color scheme, and gives advice on creating the details of the drawing.
At the end of the lesson, the teacher asks the children to look at the finished picture and pay attention to whether all the houses turned out smooth and neat, and also look carefully to check everything else. Children examine their work, find their favorite details, and explain their choice.
Well done boys!
Did you guys like today's lesson? What do you remember most? I suggest that today at home you and your parents make a model of your house and then show it to us in the garden.
Educational portal
Joint activities with children of primary preschool age
Collective application on the theme “My Home”
Educational areas “Artistic creativity”, “Communication”, “Cognition”
Zhurba A.D., teacher of GBDOU No. 99
- Saint Petersburg
- Program content:
Teach children to compose an image from several parts, following a certain sequence; position it correctly on the panel. Refine your knowledge of geometric shapes (square, triangle, rectangle). Fix the names of colors, develop color perception, aesthetic taste. Cultivate accuracy when working with glue.
Equipment: a picture with a view of the city, a construction set, cut-out blanks (squares, rectangles, triangles), brushes, glue, napkins, a sheet of whatman paper.
Application
The best works of participants and winners of the competition “My Home, My Garden, My City”
Happy birthday, Saratov region!
Authors: students of the senior group “Smile”, teacher Andreeva Yulia Sergeevna. MBDOU “Kindergarten No. 11 “Nest”, Yoshkar-Ola.
Our kindergarten is designed for two groups. The entire building is divided into two wings. You can go upstairs using the purple or blue elevator, which makes three stops. The first stop is a walking balcony-greenhouse. The second stop is corners of solitude, where calm music is always playing, there are shelves with books, soft sofas, a lot of soft toys... The third and last stop is the green and orange playrooms, connected by a green corridor. Three rooms upstairs are a dining room, a study area and a common area bedroom... You can travel from one wing to another by mini-train. He makes three stops: near two children's play stations, blue and purple, and in front of the educational complex located on the right. On the ground floor of the complex there is an orange music room, on the second there is a sports hall, on the third there is an art studio, and even higher there is a mini-zoo.. The last floor is a swimming pool. Above and to the left of the play station there is a center for experimentation and children's research (pink), and even higher – mini planetarium (yellow). It can be accessed via a ladder. On the roof of the planetarium is a launching pad for young balloonists. In good weather, excursions are organized
on the air balloon.
Authors: pupils of MBDOU “Kindergarten No. 6 “Fairy Tale”, city of Tsivilsk.
Kudryashova Arina, Zemtsova Sofia, 6 years old
Authors: Batura Timofey, 5 years old, Derakch Vladimir, 4 years old, teacher Korotkova Tatyana Aleksandrovna. MBDOU "Golden Fish", Noyabrsk.
We built a kindergarten out of geometric shapes. In the central building with a large gate, teachers meet children in the morning. When it's time for breakfast, lunch or dinner, children go to the mushroom-shaped building. The next building, with diamond-shaped windows, is for relaxation: there are comfortable beds on which children sleep. The unusual building on the right side is a place for games and activities. There are many games and toys for children to play and do interesting things.