Dymkovo toys are among the oldest Russian folk crafts (dating back to the 15-16th century). The craft originated in the territory of what is now the Kirov region, and most recently the patterns of this creativity were used in the design of the Winter Olympic Games in Sochi (2014). Also, these crafts are widely used to develop fine motor skills in preschool institutions. The most common option is the Dymkovo toy, which everyone calls “The Young Lady,” made using various techniques.
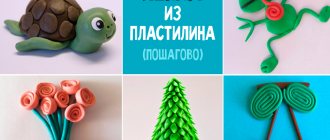
Dymkovo lady from a plastic bottle and plasticine. Master class with step-by-step photos
Dymkovo lady made of plasticine. Master Class
Master class with step-by-step photos: do-it-yourself decorative toy made of plasticine using waste material.
Author: Anastasia Vladimirovna Sadkovkina, teacher of fine arts and technology, Secondary School No. 121, Moscow. Description: The material can be useful to teachers, parents, and anyone who is interested in creativity. Purpose: as a gift, interior decoration, work for an exhibition. Goal: modeling of the Dymkovo lady from plasticine. Objectives: - expand theoretical knowledge about Dymkovo toys, traditions of form and painting, pattern, ornament;
— to cultivate in children taste, a sense of color, and respect for the work of Dymkovo craftsmen. - develop creative and cognitive activity, artistic imagination and taste; — develop fine motor skills of the hand, skills of correct work with plasticine; — improve skills in working with different materials and tools. Dymkovo lady.
In the old days, many people couldn’t afford to buy a toy. And children always want to play. And in the suburbs and villages there were wonderful inventors and craftsmen. “Children’s fun” was made from all sorts of things—toys! From washcloths, rags, wood, straw. Well, where the potters lived, they sculpted from clay. And in one village, potters organized an original clay craft, came up with a clay toy and named it after their village - Dymkovskaya.
All toys are not simple, but magically painted.
Snow-white, like birch trees, Circles, stripes. A seemingly simple pattern, But I can’t take my eyes off it. The Dymkovo toy is hand-painted and the simple pattern invented by the master is never repeated, so it is impossible to find two identical toys. That is, no, and there are no two identical products. Each toy is unique and one of a kind. The toys made by Dymkovo craftsmen turn out to be unusually beautiful, bright, fabulous, and magical. People believed that these toys protected them from misfortunes and troubles. Therefore, they were made not only for the fair for decoration and games, but were used as a talisman and placed between the windows of the house in winter. Dymkovo craftswomen keenly noticed the features of clothing and, based on their observations, created images that were conventional in form. Over time, fashion became more universal, losing the features of folk style, and the Dymkovo toy remained a unique reflection of the clothing of bygone eras. The patterns on the clothes also corresponded to the patterns on real fabrics - plain-dyed, checkered, polka-dot and small flowers, and painting elements - the simplest geometric elements: circles, rings, stripes, snakes.
A strictly geometric ornament is built according to a variety of compositional schemes: cells, stripes, circles, dots are applied in various combinations. Bizarre combinations of simple decorations in color, size, and alternations with each other allow you to create charming and amazingly diverse painting compositions. This can be easily demonstrated using a cut-out model of the Dymkovo toy and insert elements painted with traditional patterns of the Dymkovo outfit.
The Dymkovo toy is characterized by the use of symbolism that strives for beauty, truth and a healthy life.
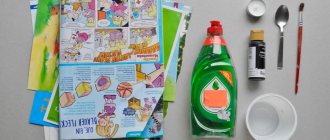
All the patterns in the traditional Dymkovo toy are iconic, associated with nature and amulets. For example, a ring is a talisman, a circle with intersecting stripes are solar solar signs. Dots in a circle or alternating dots with a circle are signs of seeds and embryos, a stripe is a road or river, black dots are human traces. It is important to know the meaning of color. The color green in popular belief is associated with the concept of life and symbolizes nature, earth, arable land. White has always been associated with the concept of moral purity, truth and goodness. Red color is not only a symbol of fire, but also of beauty, strength, glory, and health. Blue is the color of the sky. The Dymkovo toy is a truly unique and amazing handmade gift! This craft will bring pleasure not only to you and your children, but also to those around you. Equipment and materials: plastic bottle with a capacity of 0.5 (0.6; 1) l (upper part “skirt” with a lid), plasticine, modeling board, stack, napkins.
Progress of the master class:
For sculpting we need a frame - the upper part of an ordinary plastic bottle, its shape resembles the skirt of a Dymkovo lady.
Carefully cut off the top of the bottle, leaving the cap in place so that the plasticine does not fall inside. The frame for the Lady is cut off for the children at home by their parents.
Depending on what shape the bottle has, the Lady will have the same shape.
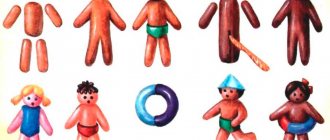
The traditional appearance of toys is created by painting on a chalk white background - this is the color of purity. 1. We begin work with a drawing on the skirt - applying a white background. Knead a piece of white plasticine well so that it is very soft. Roll out the sausage and give it the shape of an icicle. Spread the sausage in a strip along the “skirt” from the neck to the base, with the widened part towards the bottom. Smear the plasticine in the shape of a cone. We trim the uneven edges with a stack. 1) Leaving small gaps, we “draw” four wedges. For a geometric pattern, plasticine will suit any color. But it is better to take the colors traditionally used to paint the lady: red, orange, green, yellow, blue, cyan. 2) We take red plasticine - the color of the sun. Roll out thin sausages and, spreading from top to bottom, fill the gaps between the wedges. 3) We encircle the bottom of the skirt with a strip of red plasticine. In one place between two white wedges we fill the gap with white plasticine - a place for the future apron. 4) Draw a checkered pattern on the skirt with transverse strips of red plasticine.
5 - 6) We complete the geometric pattern with strips of orange plasticine. We continue painting the lady’s skirt with traditional rings and circles. Roll out sausages from red, white and orange plasticine. The circles must be the same size; to do this, the collected amount of plasticine must be divided into equal parts. Roll them into small balls. 1) Place a ball of red plasticine in the middle of the cell. 2) Flatten it, pressing it into the base and on top, place a white ball. 3) We repeat the operation, turn the circle into a ring, and place an orange ball in the center. 4) “Draw” the traditional Dymkovo pattern. We make it flat, creating the effect of a drawn pattern.
We paint the entire skirt with this pattern. We decorate the apron with a frill. From white plasticine we make a sausage with a thickness of 0.5 cm and a length of about 10-15 cm. We get a flat ribbon that can be easily assembled. We apply the frill to the skirt and smooth it, trying not to wrinkle the part.
Using green plasticine we draw a pattern on the red stripes.
We decorate the aprons with an elegant pattern. Using dots of orange plasticine, we draw grains on the apron pattern. 2. The second step is to create the base of the torso. The base is created from a lump of plasticine. Roll a ball of the required size and stick it around the bottle cap.
Roll out the sausage using your hands. We place the yoke on the lady’s torso and apply it. 1) Form a head from white plasticine. 2) Attach to the torso. 3) Apply it and give it the shape of a bodice.
From green plasticine we fashion a strip in the form of a ribbon and add waviness. Making a collar. We draw a decoration on the neck - beads. We make a beautiful hairstyle for the doll. 1) We make flagella from thin sausages. 2) We place a wreath on the head from individual flagella. 3) At the back we attach a flagellum in the form of a braid. 4) Twisting in a spiral, we make a bun.
We make a headdress. 1) We sculpt the elements of the kokoshnik. We fashion separate parts from the balls: a part in the form of a crescent and a strip in the form of a ribbon, slightly bending it to give it a waviness. 2) We connect all the parts, smear and smooth. 3) Form a kokoshnik.
We draw patterns on the kokoshnik. We make earrings. Let's draw a face.
And here is the girl in the crown, with a blush on her face, looking pretty, standing without breathing.
Our hands are like pretzels, our cheeks are like apples. All the people at the fair have known us for a long time. In the 19th century, Dymkovo ladies appeared with babies, birds, baskets of pies, a rocker and other household items. We will also add one more detail to our toy. We sculpt for the lady a pretzel or a dog or a loaf or an object that you like best and suits your unique lady.
We are painted toys - Vyatka laughter, Sloboda dandies, townsfolk gossips.
We are noble toys, foldable, okay. We are famous everywhere, and you will like us too.
We recommend watching:
Master Class. Crafts made from salt dough Dymkovo young lady
Lesson with older preschoolers. Dymkovo toy Dymkovo young lady made from salt dough Master class with step-by-step photos. Making and painting the Dymkovo young lady
Similar articles:
Master class for preschool teachers. Dymkovo lady
Step by Step Painting - Painting on canvas with acrylic paint for the absolute beginner!
This painting website/blog is filled with easy acrylic painting tutorials for beginners designed by Tracy Kiernan!
Each tutorial has step-by-step images, written instructions, and videos to help you learn at home for FREE!
New and coming soon lessons on painting on acrylic canvas:
Quick links:
Helpful blog posts:
Paintings:
While I believe any of my paintings can be adapted and simplified for all ages and skill levels, these ones in particular are especially suitable for children! Most of them include traceable information that you can print and transfer to your canvas.
TO LEARN MORE!
Digital Downloads:
VIEW OTHER ELECTRONIC LESSONS!
Anyone can draw!
Drawing is a wonderful stress-relieving activity that helps you escape from life for a while. I believe that everyone has an inner artist, no matter how much experience they have in art and painting.
I also know how intimidating a blank canvas can be. That's why I created these guides to help walk you through all the steps so you don't have to think about all that complicated stuff! You CAN create something you will be proud of!
Complex coloring pages with a lot of small elements
Dymkovo toys (templates for drawing, as well as drawings for coloring, are freely available on the Internet), due to the variety of their options, can be used in work with older children.
For schoolchildren attending grades 3–5, it will be interesting to paint more complex patterns with a lot of small details.
Teachers recommend drawing parents’ attention to the following pictures:
| Sketch for coloring | Description of the drawing and the principle of working with it |
| "Walk". This picture for coloring is a complete artistic composition. It depicts a man and a woman floating in a boat on a river. The task facing the child is to make colorful not only people’s costumes, consisting of small parts, but also the objects surrounding them. These include the celestial bodies, the pattern on the ship and the waves. The main colors that the student will work with are red, blue, white, black and their derivatives. | |
| "The Bears". This sketch shows a family of bears. Animals are depicted in human form: they wear clothes and jewelry. The difficulty in coloring this drawing lies in the large number of small details of the characters' clothing. To complicate the task, you can invite the child to make the picture as realistic as possible (paint the bears in the appropriate colors, as in life, and their clothes in the shades most often found in adult wardrobe items). Typically, children work with this image using blue, red, black, yellow, brown and white colors. | |
| "Rider". This is one of the most popular pictures for coloring, used by teachers when working with them. It depicts a boy standing on a horse. In this case, the child will need to carefully paint the smallest details of the image of the young man, as well as reproduce the color of the animal and surrounding objects. It is recommended to work with brown, black, red, blue, yellow, orange, blue and green. |
painting
After the whitewash dries, the painting stage begins - applying simple patterns with bright colors. The choice of colors is small: blue, orange, green, brown, yellow, crimson. Additional colors can be obtained by diluting the main ones with chalk. So, highlighted blue and raspberry give blue and pink, respectively.
Instead of brushes, in the old days they used wooden sticks with a linen rag wrapped around them. Therefore, the ornament was extremely simple: straight or wavy lines, circles, diamonds, etc. Currently, craftswomen use brushes made of kolinsky or ferret.
By the way, a raw egg is added to the paint. This makes the colors more saturated and gives the figure shine. Lastly, the toy is decorated with gold leaf. Geometric shapes cut out of it are glued onto the hats and collars of ladies, ears or horns of animals. This makes the Dymkovo toy especially festive. Photos cannot always convey their magnificence.
Painting, as a rule, is applied according to a certain pattern. Human faces look pretty monotonous. The cheeks and mouth are outlined with crimson paint, the arches of the eyebrows and round eyes are drawn with black paint. Hair is dyed predominantly dark in color: black or brown. Shirts and hats are made plain, and ladies' skirts and animal skins are covered with ornaments over white.
Complex coloring pages with a lot of small elements
Lesson summary on the “traffic light” application in the middle group
Dymkovo toys (templates for drawing, as well as drawings for coloring, are freely available on the Internet), due to the variety of their options, can be used in work with older children.
For schoolchildren attending grades 3–5, it will be interesting to paint more complex patterns with a lot of small details.
Teachers recommend drawing parents’ attention to the following pictures:
| Sketch for coloring | Description of the drawing and the principle of working with it |
| "Walk". This picture for coloring is a complete artistic composition. It depicts a man and a woman floating in a boat on a river. The task facing the child is to make colorful not only people’s costumes, consisting of small parts, but also the objects surrounding them. These include the celestial bodies, the pattern on the ship and the waves. The main colors that the student will work with are red, blue, white, black and their derivatives. | |
| "The Bears". This sketch shows a family of bears. Animals are depicted in human form: they wear clothes and jewelry. The difficulty in coloring this drawing lies in the large number of small details of the characters' clothing. To complicate the task, you can invite the child to make the picture as realistic as possible (paint the bears in the appropriate colors, as in life, and their clothes in the shades most often found in adult wardrobe items). Typically, children work with this image using blue, red, black, yellow, brown and white colors. | |
| "Rider". This is one of the most popular pictures for coloring, used by teachers when working with them. It depicts a boy standing on a horse. In this case, the child will need to carefully paint the smallest details of the image of the young man, as well as reproduce the color of the animal and surrounding objects. It is recommended to work with brown, black, red, blue, yellow, orange, blue and green. |
Materials for making folk toys
Traditionally, handicrafts are made from clay. But other options are also possible - plasticine and salt dough. In this case, the difference is only in the material; the young lady herself) does it with her own hands in the same way as traditional samples.
In classes with children, when organizing joint creativity, you can choose any of three materials. Each has its own advantages and disadvantages. Modeling the Dymkovo young lady in stages - repeating the same operations.
Clay, the most common material, requires a lot of effort and special equipment, but the products are durable and the most reliable, close to the original.
Children do not really like working with cold, wet and capricious clay, which must be constantly wetted during the work process; they prefer warm and soft plasticine or pliable dough.
System of images and plots
If we compare the surviving images of the first products with modern examples of this folk art, we cannot help but notice that over hundreds of years their creators have stepped far forward. The toy got rid of the simplicity of its form and ornamentation and became more decorative, and the number of plots increased significantly.
Although craftsmen claim that no two figures are absolutely identical, five main typical groups can be distinguished:
- Female images (young ladies and mistresses, nannies and nurses with a child in their arms, water bearers). The ladies have corsets and crinolines, umbrellas in their hands, fashionable hats and outfits; nurses in kokoshniks, wide skirts, aprons with frills. Static figures full of majesty and dignity.
- Cavaliers are often depicted on horseback in profile. Compared to women's images, they are smaller in size and look simpler.
- Animals. Initially, figurines were created depicting totem animals: a ram, a goat, a deer, a bear, and images of various domestic animals were gradually added. A distinctive feature of this type: an upturned head and short legs, widely spaced. Often the figures are “dressed up” in bright colorful costumes of musicians with instruments in their hands.
- Birds (roosters, turkeys, ducks). Ducks have lush capes, roosters and turkeys have bright, curly tails.
- Compositions. They can include both people and animals. They present various scenes from Russian city and village life: tea drinking, folk festivals, sleigh rides and many others.
The most cozy style of Christmas tree outfit
In modern times, the handmade style in decorating a holiday tree is becoming increasingly popular. This is not surprising, because the New Year is a family holiday, which should bring peace and comfort to the house, unite families together, and such an important detail as a Christmas tree greatly contributes to creating the right atmosphere in the house.
In addition, pre-New Year preparations are a great opportunity to spend time with your family and children, captivate them with the process of creating New Year's toys with your own hands and then decorating the tree together. How to decorate a Christmas tree for the New Year in 2022 by making decorations with your own hands?
There can be a huge number of ideas for this. Perhaps you have a hobby that will help you make interesting handmade Christmas tree decorations. Sewing and knitting are the most common ways to make toys, but other unusual methods can also be used.
Do-it-yourself edible decorations will be one of the most enjoyable ways to decorate a holiday tree for a child, because it is not only entertaining and beautiful, but also delicious.
Small gingerbread cookies of various shapes, covered with brightly colored confectionery glaze, candies in shiny wrappers, chocolate - all this will help you decorate the tree in an unusual way, just do not forget that chocolate, additionally heated by New Year's garlands, tends to melt quickly. Therefore, a tree decorated in this way is unlikely to stay with you throughout the holidays.
Gifts of nature
You can start preparing for the holiday in advance, from the beginning of the year, by collecting any items with which you will later decorate the tree. These can be dried fruits, shells, pine cones, flowers from the herbarium, which need to be coated with varnish and glitter before the holiday.
You can make very beautiful and unusual New Year's toys with your own hands from natural materials.
Your hobby
Collecting is another hobby that can help you create an unusual outfit for a coniferous beauty. If you collect any items - stamps, coins, badges, then you can use them in decorating your holiday interior.